Data distribution
When you create a table, you must specify the data distribution method by configuring the partitioning and bucketing strategy in the table. An appropriate data distribution method helps evenly distribute data across the nodes of your StarRocks cluster, reduces table scans, makes full use of the concurrency of the cluster, thereby improving query performance.
NOTICE
Since v2.5.7, StarRocks can automatically set the number of buckets (BUCKETS) when you create a table or add a partition. You no longer need to manually set the number of buckets. However, if the performance does not meet your expectations after StarRocks automatically sets the number of buckets and you are familiar with the bucketing mechanism, you can still manually set the number of buckets.
Basic concepts
Before you dive into the details of designing and managing data distribution, familiarize yourself with the following concepts:
-
Partitioning
Partitioning divides a table into multiple segments called partitions based on the partitioning column you specified. You can set a storage strategy for partitions, including the number of replicas, strategy of storing hot or cold data, and storage medium. StarRocks allows you to use multiple storage mediums within a cluster. For example, you can store the latest data on solid-state drives (SSD) to improve query performance, and historical data on SATA hard drives to reduce storage costs.
-
Bucketing
Bucketing divides a partition into multiple more manageable parts called tablets, which is the smallest unit of storage that you can use and allocate. StarRocks uses a hash algorithm to bucket data. Data with the same hash value of the bucketing column is distributed to the same tablet. StarRocks creates multiple replicas (three by default) for each tablet to prevent data loss. These replicas are managed by a separate local storage engine.
You must specify the bucketing column when you create a table. Since v2.5.7, StarRocks can automatically set the number of buckets (BUCKETS) when you create a table or add a partition. You no longer need to manually set the number of buckets. For detailed information, see determine the number of buckets.
Partitioning methods
Modern distributed database systems generally use four basic partitioning methods: round-robin, range, list, and hash.
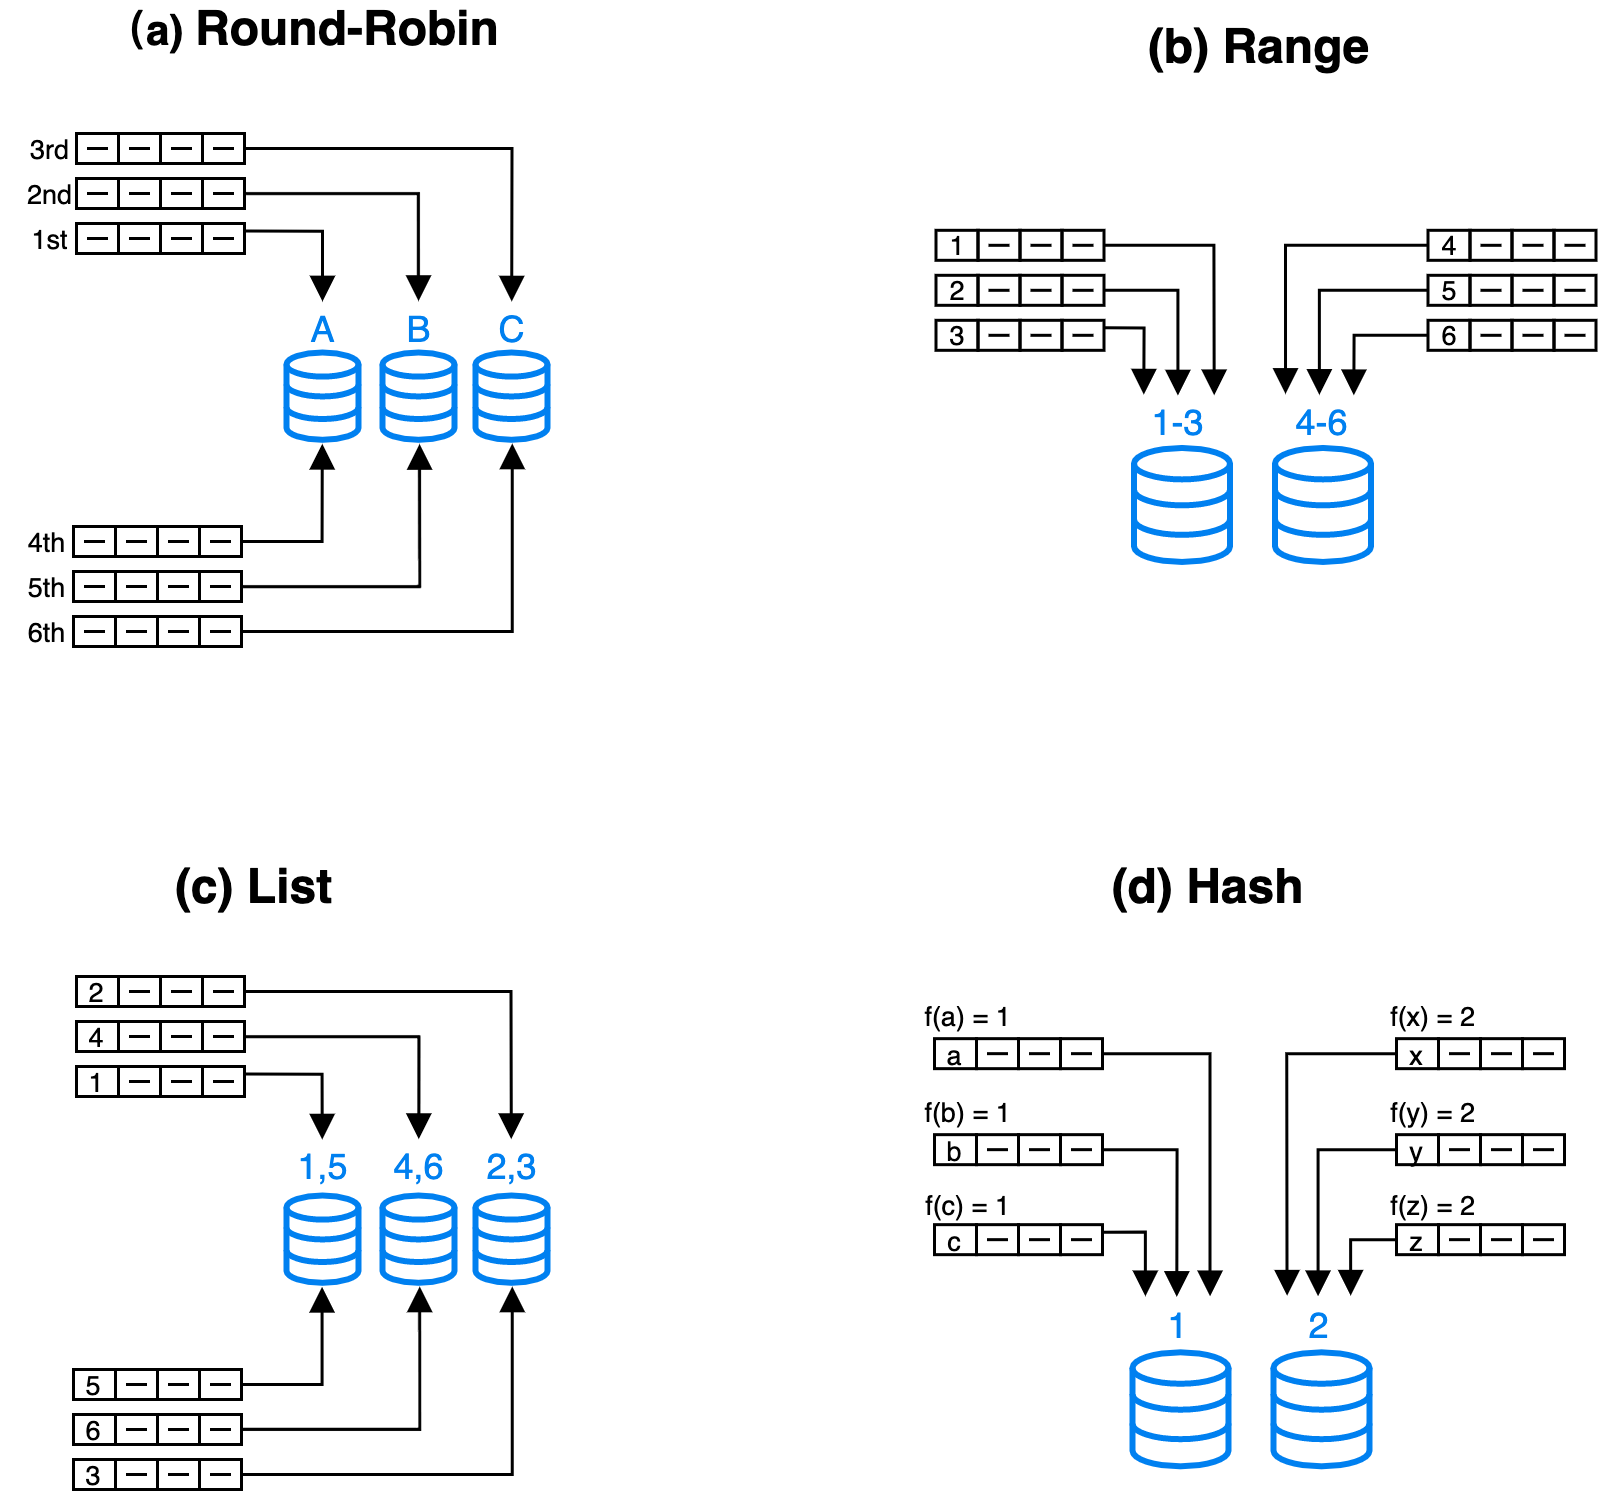
- Round-robin: distributes data across different nodes in a cyclic.
- Range: distributes data across different nodes based on the value range of partitioning columns.
- List: distributes data across different nodes based on the discrete values of partitioning columns, such as age.
- Hash: distributes data across different nodes based on a hash algorithm.
To achieve more flexible data distribution, you can combine the preceding four partitioning methods based on your business requirements, such as hash-hash, range-hash, and hash-list. StarRocks offers the following two partitioning methods:
-
Hash: A hash-partitioned table has only one partition (the entire table is considered a partition). The partition is divided into tablets based on the bucketing column and the number of buckets (either manually specified or automatically configured).
For example, the following statement creates a table
site_access. The table is divided into tablets based on thesite_idcolumn and the number of buckets.CREATE TABLE site_access(
site_id INT DEFAULT '10',
city_code SMALLINT,
user_name VARCHAR(32) DEFAULT '',
pv BIGINT SUM DEFAULT '0'
)
AGGREGATE KEY(site_id, city_code, user_name)
DISTRIBUTED BY HASH(site_id); -
Range-hash: A range-hash partitioned table divides data into multiple partitions based on the partitioning column. Each partition is further divided into tablets based on the bucketing column and the number of buckets.
For example, the following statement creates a table
site_accessthat is partitioned by theevent_daycolumn. The table contains 3 partitions:p1,p2, andp3. Each partition is divided into tablets based on thesite_idcolumn and the number of buckets.CREATE TABLE site_access(
event_day DATE,
site_id INT DEFAULT '10',
city_code VARCHAR(100),
user_name VARCHAR(32) DEFAULT '',
pv BIGINT SUM DEFAULT '0'
)
AGGREGATE KEY(event_day, site_id, city_code, user_name)
PARTITION BY RANGE(event_day)
(
PARTITION p1 VALUES LESS THAN ("2020-01-31"),
PARTITION p2 VALUES LESS THAN ("2020-02-29"),
PARTITION p3 VALUES LESS THAN ("2020-03-31")
)
DISTRIBUTED BY HASH(site_id);
Design partitioning and bucketing rules
Before you partition a table, determine the partitioning column, bucketing column, and the number of tablets.
Choose partitioning columns
Data in a partitioned table is divided based on partitioning columns, also called partition keys. Generally, date or area is used as the partitioning column. In StarRocks, only the column of the DATE, DATETIME or INT type can be used as the partitioning column. We recommend that you follow the suggestions below to decide the partitioning column:
- The column with low cardinality.
- The column that is often used as a filter in queries.
- The amount of data in each partition must be less than 100 GB.
Choose bucketing columns
Data in partitions can be subdivided into tablets based on the hash values of the bucketing columns and the number of buckets. We recommend that you choose the column that satisfy the following two requirements as the bucketing column.
- high cardinality column such as ID
- column that often used as a filter in queries
But if the column that satisfies both requirements does not exist, you need to determine the bucketing column according to the complexity of queries.
- If the query is complex, it is recommended that you select the high cardinality column as the bucketing column to ensure that the data is as balanced as possible in each bucket and improve the cluster resource utilization.
- If the query is relatively simple, then it is recommended to select the column that is often used as in the query condition as the bucketing column to improve the query efficiency.
If partition data cannot be evenly distributed into each tablet by using one bucketing column, you can choose multiple bucketing columns. You can decide on the number of bucketing columns based on the following scenarios:
- One bucketing column: This method can reduce data transmission between nodes. It improves the performance of short-running query because short-running query only runs on one server and scan a small amount of data.
- Multiple bucketing columns: This method makes the most of the concurrency performance of a distributed cluster. It improves the performance of long-running query because long-running query runs across multiple servers and scan a large amount of data by using multiple servers in parallel. We recommend that you choose three bucketing columns at most.
Precautions
- When a table is created, you must specify the bucketing columns.
- The data types of bucketing columns must be INTEGER, DECIMAL, DATE/DATETIME, or CHAR/VARCHAR/STRING.
- Bucketing columns cannot be modified after they are specified.
Examples
The following statement creates a table named site_access.
CREATE TABLE site_access(
    event_day DATE,
    site_id INT DEFAULT '10',
    city_code VARCHAR(100),
    user_name VARCHAR(32) DEFAULT '',
    pv BIGINT SUM DEFAULT '0'
)
AGGREGATE KEY(event_day, site_id, city_code, user_name)
PARTITION BY RANGE(event_day)
(
    PARTITION p1 VALUES LESS THAN ("2020-01-31"),
    PARTITION p2 VALUES LESS THAN ("2020-02-29"),
    PARTITION p3 VALUES LESS THAN ("2020-03-31")
)
DISTRIBUTED BY HASH(site_id);
In this example, site_access uses site_id as the bucketing column because this column is always used as a filter in queries. When the bucketing column is used as a filter in queries, StarRocks only scans the relevant tablets, which greatly improves query performance.
Suppose each partition of table site_access has 10 buckets. In the following query, 9 out of 10 buckets are pruned, so StarRocks only needs to scan 1/10 of the data in the site_access table:
select sum(pv)
from site_access
where site_id = 54321;
However, if site_id is unevenly distributed and a large number of queries are destined for only a few sites, the preceding bucketing method will cause severe data skew, causing system performance bottlenecks. In this case, you can use a combination of bucketing columns. For example, the following statement uses site_id and city_code as bucketing columns.
CREATE TABLE site_access
(
    site_id INT DEFAULT '10',
    city_code SMALLINT,
    user_name VARCHAR(32) DEFAULT '',
    pv BIGINT SUM DEFAULT '0'
)
AGGREGATE KEY(site_id, city_code, user_name)
DISTRIBUTED BY HASH(site_id,city_code);
Determine the number of buckets
Buckets reflect how data files are organized in StarRocks.
-
How to set the number of buckets when creating a table
-
Method 1: automatically set the number of buckets (Recommended)
Since v2.5.7, StarRocks supports automatically setting the number of buckets based on machine resources and data volume for a partition.
Example:
CREATE TABLE site_access(
    site_id INT DEFAULT '10',
    city_code SMALLINT,
    user_name VARCHAR(32) DEFAULT '',
    pv BIGINT SUM DEFAULT '0'
)
AGGREGATE KEY(site_id, city_code, user_name)
DISTRIBUTED BY HASH(site_id,city_code); -- do not need to set the number of buckets
To enable this feature, make sure that the FE dynamic parameter
enable_auto_tablet_distributionis set toTRUE. After a table is created, you can execute SHOW PARTITIONS to view the bucket number automatically set by StarRocks for each partition. -
Method 2: manually set the number of buckets
StarRocks 2.4 and later versions support using multiple threads to scan a tablet in parallel during a query, thereby reducing the dependency of scanning performance on the tablet count. We recommend that each tablet contain about 10 GB of raw data. If you intend to manually set the number of buckets, you can estimate the the amount of data in each partition of a table and then decide the number of tablets. To enable parallel scanning on tablets, make sure the
enable_tablet_internal_parallelparameter is set toTRUEglobally for the entire system (SET GLOBAL enable_tablet_internal_parallel = true;).CREATE TABLE site_access (
site_id INT DEFAULT '10',
city_code SMALLINT,
user_name VARCHAR(32) DEFAULT '',
pv BIGINT SUM DEFAULT '0')
AGGREGATE KEY(site_id, city_code, user_name)
DISTRIBUTED BY HASH(site_id,city_code) BUCKETS 30; -- Suppose the amount of raw data that you want to load into a partition is 300 GB. Because we recommend that each tablet contain 10 GB of raw data, the number of buckets can be set to 30.
-
-
How to set the number of buckets when adding a partition
-
Method 1: automatically set the number of buckets (Recommended)
Since v2.5.7, StarRocks supports automatically setting the number of buckets based on machine resources and data volume for a partition. To enable this feature, make sure that the FE dynamic parameter
enable_auto_tablet_distributionretains the default valueTRUE.To disable this feature, run the
ADMIN SET FRONTEND CONFIG ('enable_auto_tablet_distribution' = 'false');statement. And when a new partition is added without specifying the number of buckets, the new partition inherits the the number of buckets set at the creation of the table. After a new partition is added successfully, you can execute SHOW PARTITIONS to view the number of buckets automatically set by StarRocks for the new partition. -
Method 2: manually set the number of buckets
You can also manually specify the bucket count when adding a new partition. To calculate the number of buckets for a new partition, you can refer to the approach used when manually setting the number of buckets at table creation, as mentioned above.
-- Manually create partitions
ALTER TABLE <table_name>
ADD PARTITION <partition_name>
    [DISTRIBUTED BY HASH (k1[,k2 ...]) [BUCKETS num]];

-- Dynamic partitioning
ALTER TABLE <table_name>
SET ("dynamic_partition.buckets"="xxx");
-
NOTICE
You cannot modify the number of buckets for an existing partition. You can only modify the number of buckets when you add a partition.
Manage partitions
Create partitions
Since version 3.0, StarRocks supports automatic partitioning during data loading. You no longer need to create a large number of partitions in advance. This on-demand partition creation method can help you reduce the O&M costs.
NOTICE
Currently, StarRocks's shared-data mode does not support this feature.
If you need to create partitions in advance, you can use other partition creation methods, such as enabling dynamic partitioning and manually creating partitions.
-
Dynamic partitioning
StarRocks supports dynamic partitioning, which can automatically manage the time to live (TTL) of partitions, such as partitioning new input data in tables and deleting expired partitions. This feature significantly reduces maintenance costs.
-
Manually create partitions
-
Partition a table with the LESS THAN clause. For more information, see CREATE TABLE.
PARTITION BY RANGE (k1, k2, ...)
(
    PARTITION partition_name1 VALUES LESS THAN ("value1", "value2", ...),
    PARTITION partition_name2 VALUES LESS THAN ("value1", "value2", ...),
    PARTITION partition_name3 VALUES LESS THAN ("value1", "value2", ...)
) -
Partition a table by specifying values of a fixed range. For more information, see CREATE TABLE.
PARTITION BY RANGE (k1, k2, k3, ...)
(
    PARTITION partition_name1 VALUES [("k1-lower1", "k2-lower1", "k3-lower1",...), ("k1-upper1", "k2-upper1", "k3-upper1", ...)],
    PARTITION partition_name2 VALUES [("k1-lower1", "k2-lower1", ...), ("k1-upper1", "k2-upper1", "k3-upper1", ...)],
) -
Create multiple partitions at a time.
Partition a table by specifying START, END, and EVERY. You can create multiple partitions at a time by using this method. For more information, see CREATE TABLE.
PARTITION BY RANGE (k1, k2, ...)
(
    START ("value1") END ("value2") EVERY (INTERVAL value3 day)
)
Examples
The following examples demonstrate how to partition a table by specifying START, END, and EVERY.
-
The data type of the partitioning column is DATE and you specify the time range of partitioning via START and END and define the time range via EVERY. Example:
CREATE TABLE site_access (
    datekey DATE,
    site_id INT,
    city_code SMALLINT,
    user_name VARCHAR(32),
    pv BIGINT DEFAULT '0'
)
ENGINE=olap
DUPLICATE KEY(datekey, site_id, city_code, user_name)
PARTITION BY RANGE (datekey) (
    START ("2021-01-01") END ("2021-01-04") EVERY (INTERVAL 1 DAY)
)
DISTRIBUTED BY HASH(site_id)
PROPERTIES ("replication_num" = "3" );
The PARTITION BY RANGE clause in this example is equal to the following:
PARTITION BY RANGE (datekey) (
PARTITION p20210101 VALUES [('2021-01-01'), ('2021-01-02')),
PARTITION p20210102 VALUES [('2021-01-02'), ('2021-01-03')),
PARTITION p20210103 VALUES [('2021-01-03'), ('2021-01-04'))
) -
The data type of the partitioning column is DATE and you specify different EVERY clauses for different time ranges (which cannot overlap with each other). Example:
CREATE TABLE site_access(
    datekey DATE,
    site_id INT,
    city_code SMALLINT,
    user_name VARCHAR(32),
    pv BIGINT DEFAULT '0'
)
ENGINE=olap
DUPLICATE KEY(datekey, site_id, city_code, user_name)
PARTITION BY RANGE (datekey)
(
    START ("2019-01-01") END ("2021-01-01") EVERY (INTERVAL 1 YEAR),
    START ("2021-01-01") END ("2021-05-01") EVERY (INTERVAL 1 MONTH),
    START ("2021-05-01") END ("2021-05-04") EVERY (INTERVAL 1 DAY)
)
DISTRIBUTED BY HASH(site_id)
PROPERTIES(
    "replication_num" = "3"
);
The PARTITION BY RANGE clause in this example is equal to the following:
PARTITION BY RANGE (datekey) (
PARTITION p2019 VALUES [('2019-01-01'), ('2020-01-01')),
PARTITION p2020 VALUES [('2020-01-01'), ('2021-01-01')),
PARTITION p202101 VALUES [('2021-01-01'), ('2021-02-01')),
PARTITION p202102 VALUES [('2021-02-01'), ('2021-03-01')),
PARTITION p202103 VALUES [('2021-03-01'), ('2021-04-01')),
PARTITION p202104 VALUES [('2021-04-01'), ('2021-05-01')),
PARTITION p20210501 VALUES [('2021-05-01'), ('2021-05-02')),
PARTITION p20210502 VALUES [('2021-05-02'), ('2021-05-03')),
PARTITION p20210503 VALUES [('2021-05-03'), ('2021-05-04'))
) -
The data type of the partitioning column is INT and you specify the value range of partitioning by using START and END and define the incremental value via EVERY. Example:
NOTE
Do not double quote the incremental value defined by EVERY.
CREATE TABLE site_access (
    datekey INT,
    site_id INT,
    city_code SMALLINT,
    user_name VARCHAR(32),
    pv BIGINT DEFAULT '0'
)
ENGINE=olap
DUPLICATE KEY(datekey, site_id, city_code, user_name)
PARTITION BY RANGE (datekey) (START ("1") END ("5") EVERY (1)
)
DISTRIBUTED BY HASH(site_id)
PROPERTIES ("replication_num" = "3");
The PARTITION BY RANGE clause in this example is equal to the following:
PARTITION BY RANGE (datekey) (
PARTITION p2019 VALUES [('2019-01-01'), ('2020-01-01')),
PARTITION p2020 VALUES [('2020-01-01'), ('2021-01-01')),
PARTITION p202101 VALUES [('2021-01-01'), ('2021-02-01')),
PARTITION p202102 VALUES [('2021-02-01'), ('2021-03-01')),
PARTITION p202103 VALUES [('2021-03-01'), ('2021-04-01')),
PARTITION p202104 VALUES [('2021-04-01'), ('2021-05-01')),
PARTITION p20210501 VALUES [('2021-05-01'), ('2021-05-02')),
PARTITION p20210502 VALUES [('2021-05-02'), ('2021-05-03')),
PARTITION p20210503 VALUES [('2021-05-03'), ('2021-05-04'))
) -
After a table is created, you can use the ALTER TABLE statement to add partitions for the table.
ALTER TABLE site_access
ADD PARTITIONS START ("2021-01-04") END ("2021-01-06") EVERY (INTERVAL 1 DAY);
-
-
Add a partition
You can add new partitions to store input data in a table.
The following statement adds a new partition p4 to table site_access to store data generated in April.
ALTER TABLE site_access
ADD PARTITION p4 VALUES LESS THAN ("2020-04-30")
DISTRIBUTED BY HASH(site_id);
Delete a partition
The following statement deletes partition p1 from table site_access.
ALTER TABLE site_access
DROP PARTITION p1;
Note: If a partition is deleted within 24 hours, the data of the partition remains in Trash. During the period, you can execute the RECOVER statement to restore this data.
Restore a partition
The following statement restores partition p1 to table site_access.
RECOVER PARTITION p1 FROM site_access;
View partitions
The following statement displays all partitions in table site_access.
SHOW PARTITIONS FROM site_access;