Deploy Shared-data StarRocks Manually
The preparations for manual deployment are outlined in the Deployment prerequisites and Check environment configurations documents. Please start there if you are planning a production deployment. If you are getting started with StarRocks and would like to follow one of the Quick Starts, please refer to Quick Starts.
This topic describes how to manually deploy a shared-data StarRocks cluster (in which storage and computing are decoupled). For other modes of installation, see Deployment Overview.
To deploy a shared-nothing StarRocks cluster (in which BE is responsible for both storage and computing), see Deploy Shared-nothing StarRocks Manually.
Overview
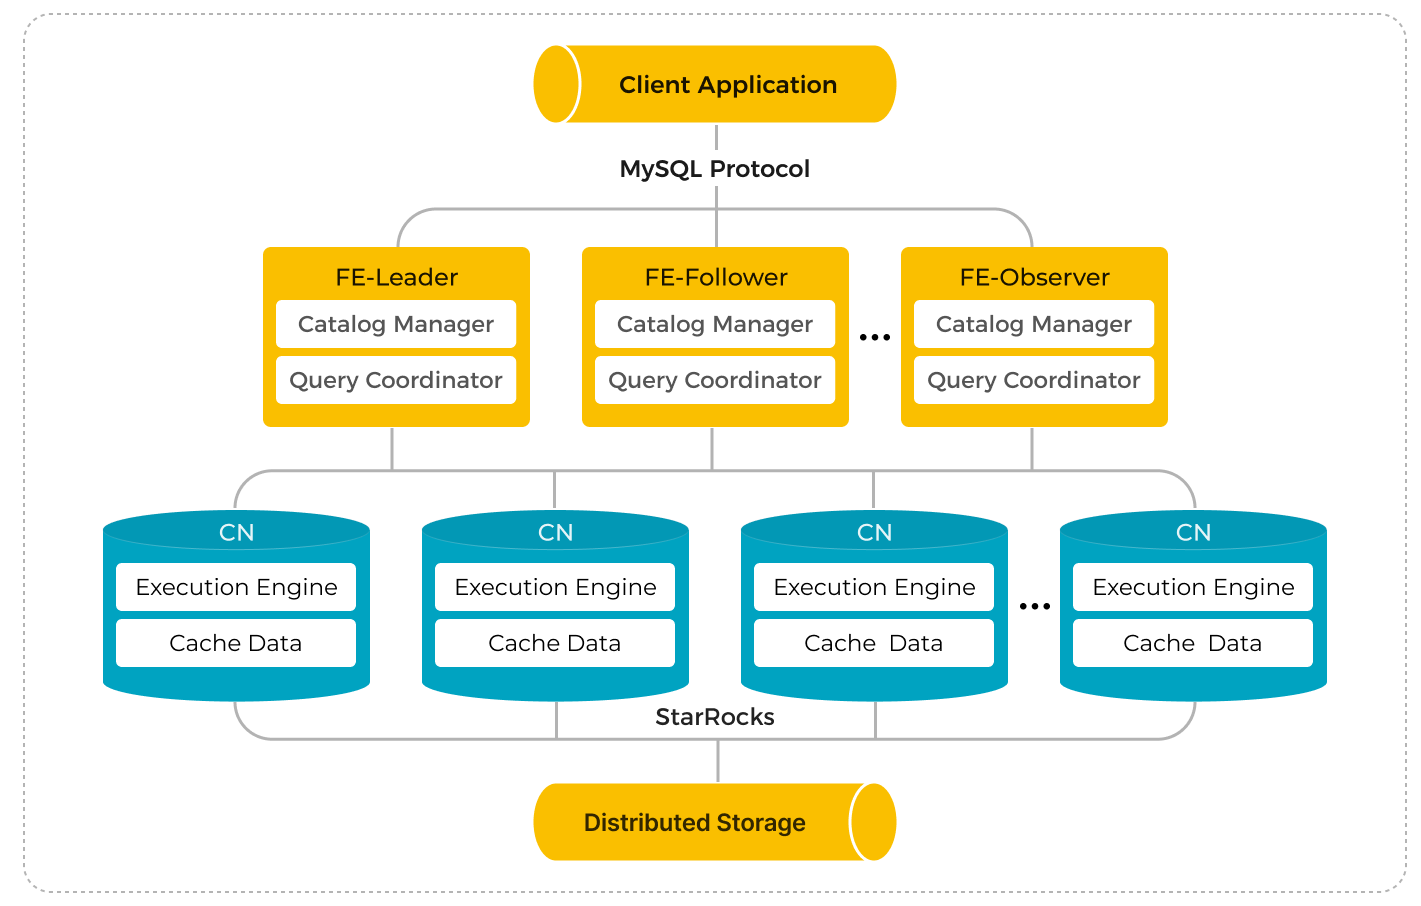
The shared-data StarRocks cluster is specifically engineered for the cloud on the premise of separation of storage and computing. It allows data to be stored in remote storage (for example, HDFS, AWS S3, Google GCS, Azure Blob Storage, Azure Data Lake Storage Gen2, and MinIO). You can achieve not only cheaper storage and better resource isolation, but elastic scalability for your cluster. The query performance of the shared-data StarRocks cluster aligns with that of a shared-nothing StarRocks cluster when the local disk cache is hit.
The StarRocks shared-data cluster is made up of Frontend Engines (FEs) and Compute Nodes (CNs), which replace the classic Backend Engines (BEs) in shared-nothing clusters.
Compared to the classic shared-nothing StarRocks architecture, separation of storage and computing offers a wide range of benefits. By decoupling these components, StarRocks provides:
- Inexpensive and seamlessly scalable storage.
- Elastic scalable computing. Because data is not stored in Compute Nodes (CNs), scaling can be done without data migration or shuffling across nodes.
- Local disk cache for hot data to boost query performance.
- Asynchronous data ingestion into remote storage, allowing a significant improvement in loading performance.
The architecture of the shared-data cluster is as follows:
Step 1: Start the Leader FE node
The following procedures are performed on an FE instance.
-
Create a dedicated directory for metadata storage. We recommend storing metadata in a separate directory from the FE deployment files. Make sure that this directory exists and that you have write access to it.
# Replace <meta_dir> with the metadata directory you want to create.
mkdir -p <meta_dir> -
Navigate to the directory that stores the StarRocks FE deployment files you prepared earlier, and modify the FE configuration file fe/conf/fe.conf.
a. Set shared-data run mode.
run_mode = shared_datab. Specify the metadata directory in the configuration item
meta_dir.# Replace <meta_dir> with the metadata directory you have created.
meta_dir = <meta_dir>c. If any of the FE ports mentioned in the Environment Configuration Checklist are occupied, you must assign valid alternatives in the FE configuration file.
http_port = aaaa               # Default: 8030
rpc_port = bbbb                # Default: 9020
query_port = cccc              # Default: 9030
edit_log_port = dddd           # Default: 9010
cloud_native_meta_port = eeee  # Default: 6090
CAUTION
If you want to deploy multiple FE nodes in a cluster, you must assign the same
http_portto each FE node.d. If you want to enable IP address access for your cluster, you must add the configuration item
priority_networksin the configuration file and assign a dedicated IP address (in the CIDR format) to the FE node. You can ignore this configuration item if you want to enable FQDN access for your cluster.priority_networks = x.x.x.x/xNOTE
- You can run
ifconfigin your terminal to view the IP address(es) owned by the instance. - From v3.3.0, StarRocks supports deployment based on IPv6.
e. If you have multiple JDKs installed on the instance, and you want to use a specific JDK that is different from the one specified in the environment variable
JAVA_HOME, you must specify the path where the chosen JDK is installed by adding the configuration itemJAVA_HOMEin the configuration file.# Replace <path_to_JDK> with the path where the chosen JDK is installed.
JAVA_HOME = <path_to_JDK>For information about advanced configuration items, see Parameter Configuration - FE configuration items.
- You can run
-
Start the FE node.
-
To enable IP address access for your cluster, run the following command to start the FE node:
./fe/bin/start_fe.sh --daemon -
To enable FQDN access for your cluster, run the following command to start the FE node:
./fe/bin/start_fe.sh --host_type FQDN --daemonNote that you only need to specify the parameter
--host_typeONCE when you start the node for the first time.CAUTION
Before starting the FE node with FQDN access enabled, make sure you have assigned hostnames for all instances in /etc/hosts. See Environment Configuration Checklist - Hostnames for more information.
-
-
Check the FE logs to verify if the FE node is started successfully.
cat fe/log/fe.log | grep thriftA record of log like "2022-08-10 16:12:29,911 INFO (UNKNOWN x.x.x.x_9010_1660119137253(-1)|1) [FeServer.start():52] thrift server started with port 9020." suggests that the FE node is started properly.
Step 2: Start the CN service
You can only add BE nodes to shared-nothing clusters and CN nodes to shared-data clusters. Otherwise, it may lead to unknown behaviors.
The following procedures are performed on the CN instances. You can deploy CN nodes with the BE deployment files.
-
Create a dedicated directory for data cache. We recommend caching data in a separate directory from the CN deployment directory. Make sure that this directory exists and you have write access to it.
# Replace <storage_root_path> with the data cache directory you want to create.
mkdir -p <storage_root_path> -
Navigate to the directory that stores the StarRocks BE deployment files you prepared earlier, and modify the CN configuration file be/conf/cn.conf.
a. Specify the data directory in the configuration item
storage_root_path. Multiple volumes are separated by semicolon (;). Example:/data1;/data2.# Replace <storage_root_path> with the data directory you have created.
storage_root_path = <storage_root_path>Local cache is effective when queries are frequent and the data being queried is recent, but there are cases that you may wish to turn off the local cache completely.
- In a Kubernetes environment with CN pods that scale up and down in number on demand, the pods may not have storage volumes attached.
- When the data being queried is in a data lake in remote storage and most of it is archive (old) data, if the queries are infrequent, the data cache will have a low hit ratio and the benefit may not be worth having the cache.
To turn off the data cache set:
storage_root_path =NOTE
The data is cached under the directory
<storage_root_path>/starlet_cache.b. If any of the CN ports mentioned in the Environment Configuration Checklist are occupied, you must assign valid alternatives in the CN configuration file.
be_port = vvvv                   # Default: 9060
be_http_port = xxxx              # Default: 8040
heartbeat_service_port = yyyy    # Default: 9050
brpc_port = zzzz                 # Default: 8060
starlet_port = uuuu              # Default: 9070
c. If you want to enable IP address access for your cluster, you must add the configuration item
priority_networksin the configuration file and assign a dedicated IP address (in the CIDR format) to the CN node. You can ignore this configuration item if you want to enable FQDN access for your cluster.priority_networks = x.x.x.x/xNOTE
- You can run
ifconfigin your terminal to view the IP address(es) owned by the instance. - From v3.3.0, StarRocks supports deployment based on IPv6.
d. If you have multiple JDKs installed on the instance, and you want to use a specific JDK that is different from the one specified in the environment variable
JAVA_HOME, you must specify the path where the chosen JDK is installed by adding the configuration itemJAVA_HOMEin the configuration file.# Replace <path_to_JDK> with the path where the chosen JDK is installed.
JAVA_HOME = <path_to_JDK>For information about advanced configuration items, see Parameter Configuration - BE configuration items because most of CN's parameters are inherited from BE.
-
Start the CN node.
./be/bin/start_cn.sh --daemonCAUTION
- Before starting the CN node with FQDN access enabled, make sure you have assigned hostnames for all instances in /etc/hosts. See Environment Configuration Checklist - Hostnames for more information.
- You do not need to specify the parameter
--host_typewhen you start CN nodes.
-
Check the CN logs to verify if the CN node is started successfully.
cat be/log/cn.INFO | grep heartbeatA record of log like "I0313 15:03:45.820030 412450 thrift_server.cpp:375] heartbeat has started listening port on 9050" suggests that the CN node is started properly.
-
You can start new CN nodes by repeating the above procedures on other instances.
Step 3: Set up the cluster
After all FE and CN nodes are started properly, you can set up the StarRocks cluster.
The following procedures are performed on a MySQL client. You must have MySQL client 5.5.0 or later installed.
-
Connect to StarRocks via your MySQL client. You need to log in with the initial account
root, and the password is empty by default.# Replace <fe_address> with the IP address (priority_networks) or FQDN
# of the Leader FE node, and replace <query_port> (Default: 9030)
# with the query_port you specified in fe.conf.
mysql -h <fe_address> -P<query_port> -uroot -
Check the status of the Leader FE node by executing the following SQL.
SHOW PROC '/frontends'\GExample:
MySQL [(none)]> SHOW PROC '/frontends'\G
*************************** 1. row ***************************
             Name: x.x.x.x_9010_1686810741121
               IP: x.x.x.x
      EditLogPort: 9010
         HttpPort: 8030
        QueryPort: 9030
          RpcPort: 9020
             Role: LEADER
        ClusterId: 919351034
             Join: true
            Alive: true
ReplayedJournalId: 1220
    LastHeartbeat: 2023-06-15 15:39:04
         IsHelper: true
           ErrMsg:
        StartTime: 2023-06-15 14:32:28
          Version: 3.0.0-48f4d81
1 row in set (0.01 sec)- If the field
Aliveistrue, this FE node is properly started and added to the cluster. - If the field
RoleisFOLLOWER, this FE node is eligible to be elected as the Leader FE node. - If the field
RoleisLEADER, this FE node is the Leader FE node.
- If the field
-
Add the CN nodes to the cluster.
-- Replace <cn_address> with the IP address (priority_networks)
-- or FQDN of the CN node, and replace <heartbeat_service_port>
-- with the heartbeat_service_port (Default: 9050) you specified in cn.conf.
ALTER SYSTEM ADD COMPUTE NODE "<cn_address>:<heartbeat_service_port>";
NOTE
You can add multiple CN nodes with one SQL. Each
<cn_address>:<heartbeat_service_port>pair represents one CN node. -
Check the status of the CN nodes by executing the following SQL.
SHOW PROC '/compute_nodes'\GExample:
MySQL [(none)]> SHOW PROC '/compute_nodes'\G
*************************** 1. row ***************************
        ComputeNodeId: 10003
                   IP: x.x.x.x
        HeartbeatPort: 9050
               BePort: 9060
             HttpPort: 8040
             BrpcPort: 8060
        LastStartTime: 2023-03-13 15:11:13
        LastHeartbeat: 2023-03-13 15:11:13
                Alive: true
 SystemDecommissioned: false
ClusterDecommissioned: false
               ErrMsg:
              Version: 2.5.2-c3772fb
1 row in set (0.00 sec)
If the field
Aliveistrue, this CN node is properly started and added to the cluster.
Step 4: (Optional) Deploy a high-availability FE cluster
A high-availability FE cluster requires at least THREE Follower FE nodes in the StarRocks cluster. After the Leader FE node is started successfully, you can then start two new FE nodes to deploy a high-availability FE cluster.
-
Connect to StarRocks via your MySQL client. You need to log in with the initial account
root, and the password is empty by default.# Replace <fe_address> with the IP address (priority_networks) or FQDN
# of the Leader FE node, and replace <query_port> (Default: 9030)
# with the query_port you specified in fe.conf.
mysql -h <fe_address> -P<query_port> -uroot -
Add the new Follower FE node to the cluster by executing the following SQL.
-- Replace <fe_address> with the IP address (priority_networks)
-- or FQDN of the new Follower FE node, and replace <edit_log_port>
-- with the edit_log_port (Default: 9010) you specified in fe.conf.
ALTER SYSTEM ADD FOLLOWER "<fe2_address>:<edit_log_port>";
NOTE
- You can use the preceding command to add a single Follower FE nodes each time.
- If you want to add Observer FE nodes, execute
ALTER SYSTEM ADD OBSERVER "<fe_address>:<edit_log_port>"=. For detailed instructions, see ALTER SYSTEM - FE.
-
Launch a terminal on the new FE instance, create a dedicated directory for metadata storage, navigate to the directory that stores the StarRocks FE deployment files, and modify the FE configuration file fe/conf/fe.conf. For more instructions, see Step 1: Start the Leader FE node. Basically, you can repeat the procedures in Step 1 except for the command used to start the FE node.
After configuring the Follower FE node, execute the following SQL to assign a helper node for Follower FE node and start the Follower FE node.
NOTE
When adding new Follower FE node to a cluster, you must assign a helper node (essentially an existing Follower FE node) to the new Follower FE node to synchronize the metadata.
-
To start a new FE node with IP address access, run the following command to start the FE node:
# Replace <helper_fe_ip> with the IP address (priority_networks)
# of the Leader FE node, and replace <helper_edit_log_port> (Default: 9010) with
# the Leader FE node's edit_log_port.
./fe/bin/start_fe.sh --helper <helper_fe_ip>:<helper_edit_log_port> --daemon
Note that you only need to specify the parameter
--helperONCE when you start the node for the first time. -
To start a new FE node with FQDN access, run the following command to start the FE node:
# Replace <helper_fqdn> with the FQDN of the Leader FE node,
# and replace <helper_edit_log_port> (Default: 9010) with the Leader FE node's edit_log_port.
./fe/bin/start_fe.sh --helper <helper_fqdn>:<helper_edit_log_port> \
      --host_type FQDN --daemon
Note that you only need to specify the parameters
--helperand--host_typeONCE when you start the node for the first time.
-
-
Check the FE logs to verify if the FE node is started successfully.
cat fe/log/fe.log | grep thriftA record of log like "2022-08-10 16:12:29,911 INFO (UNKNOWN x.x.x.x_9010_1660119137253(-1)|1) [FeServer.start():52] thrift server started with port 9020." suggests that the FE node is started properly.
-
Repeat the preceding procedure 2, 3, and 4 until you have start all the new Follower FE nodes properly, and then check the status of the FE nodes by executing the following SQL from your MySQL client:
SHOW PROC '/frontends'\GExample:
MySQL [(none)]> SHOW PROC '/frontends'\G
*************************** 1. row ***************************
             Name: x.x.x.x_9010_1686810741121
               IP: x.x.x.x
      EditLogPort: 9010
         HttpPort: 8030
        QueryPort: 9030
          RpcPort: 9020
             Role: LEADER
        ClusterId: 919351034
             Join: true
            Alive: true
ReplayedJournalId: 1220
    LastHeartbeat: 2023-06-15 15:39:04
         IsHelper: true
           ErrMsg:
        StartTime: 2023-06-15 14:32:28
          Version: 3.0.0-48f4d81
*************************** 2. row ***************************
             Name: x.x.x.x_9010_1686814080597
               IP: x.x.x.x
      EditLogPort: 9010
         HttpPort: 8030
        QueryPort: 9030
          RpcPort: 9020
             Role: FOLLOWER
        ClusterId: 919351034
             Join: true
            Alive: true
ReplayedJournalId: 1219
    LastHeartbeat: 2023-06-15 15:39:04
         IsHelper: true
           ErrMsg:
        StartTime: 2023-06-15 15:38:53
          Version: 3.0.0-48f4d81
*************************** 3. row ***************************
             Name: x.x.x.x_9010_1686814090833
               IP: x.x.x.x
      EditLogPort: 9010
         HttpPort: 8030
        QueryPort: 9030
          RpcPort: 9020
             Role: FOLLOWER
        ClusterId: 919351034
             Join: true
            Alive: true
ReplayedJournalId: 1219
    LastHeartbeat: 2023-06-15 15:39:04
         IsHelper: true
           ErrMsg:
        StartTime: 2023-06-15 15:37:52
          Version: 3.0.0-48f4d81
3 rows in set (0.02 sec)- If the field
Aliveistrue, this FE node is properly started and added to the cluster. - If the field
RoleisFOLLOWER, this FE node is eligible to be elected as the Leader FE node. - If the field
RoleisLEADER, this FE node is the Leader FE node.
- If the field
Step 5: Create and set the default storage volume
To give your shared-data StarRocks cluster permission to store data in your remote storage, you must reference a storage volume when you create databases or cloud-native tables. A storage volume consists of the properties and credential information of the remote data storage. If you have deployed a new shared-data StarRocks cluster, you must define a default storage volume before you can create databases and tables in the cluster.
Choose your cloud provider and service, and execute the corresponding statements to create and set the default storage volume.
- AWS S3
- Google Cloud Storage
- Azure Blob Storage
- Azure Data Lake Storage Gen2
- MinIO
- HDFS
The following example creates a storage volume def_volume for an AWS S3 bucket defaultbucket with the IAM user-based credential (Access Key and Secret Key), enables the Partitioned Prefix feature, and sets it as the default storage volume:
CREATE STORAGE VOLUME def_volume
TYPE = S3
LOCATIONS = ("s3://defaultbucket")
PROPERTIES
(
    "enabled" = "true",
    "aws.s3.region" = "us-west-2",
    "aws.s3.endpoint" = "https://s3.us-west-2.amazonaws.com",
    "aws.s3.use_aws_sdk_default_behavior" = "false",
    "aws.s3.use_instance_profile" = "false",
    "aws.s3.access_key" = "xxxxxxxxxx",
    "aws.s3.secret_key" = "yyyyyyyyyy",
    "aws.s3.enable_partitioned_prefix" = "true"
);

SET def_volume AS DEFAULT STORAGE VOLUME;
The following example creates a storage volume def_volume for a GCS bucket defaultbucket with Service Account-based credentials, enables the storage volume, and sets it as the default storage volume:
CREATE STORAGE VOLUME def_volume
TYPE = GS
LOCATIONS = ("gs://defaultbucket")
PROPERTIES
(
    "enabled" = "true",
    "gcp.gcs.use_compute_engine_service_account" = "false",
    "gcp.gcs.service_account_email" = "<google_service_account_email>",
    "gcp.gcs.service_account_private_key_id" = "<google_service_private_key_id>",
    "gcp.gcs.service_account_private_key" = "<google_service_private_key>"
);

SET def_volume AS DEFAULT STORAGE VOLUME;
The following example creates a storage volume def_volume for an Azure Blob Storage bucket defaultbucket with shared key access, enables the storage volume, and sets it as the default storage volume:
CREATE STORAGE VOLUME def_volume
TYPE = AZBLOB
LOCATIONS = ("azblob://defaultbucket/test/")
PROPERTIES
(
    "enabled" = "true",
    "azure.blob.endpoint" = "<endpoint_url>",
    "azure.blob.shared_key" = "<shared_key>"
);

SET def_volume AS DEFAULT STORAGE VOLUME;
The following example creates a storage volume adls2 for an Azure Data Lake Storage Gen2 file system testfilesystem with SAS token, and disables the storage volume:
CREATE STORAGE VOLUME adls2
    TYPE = ADLS2
    LOCATIONS = ("adls2://testfilesystem/starrocks")
    PROPERTIES (
        "enabled" = "false",
        "azure.adls2.endpoint" = "<endpoint_url>",
        "azure.adls2.sas_token" = "<sas_token>"
    );
The following example creates a storage volume def_volume for a MinIO bucket defaultbucket with Access Key and Secret Key credentials, enables the Partitioned Prefix feature, and sets it as the default storage volume:
CREATE STORAGE VOLUME def_volume
TYPE = S3
LOCATIONS = ("s3://defaultbucket")
PROPERTIES
(
    "enabled" = "true",
    "aws.s3.region" = "us-west-2",
    "aws.s3.endpoint" = "https://hostname.domainname.com:portnumber",
    "aws.s3.access_key" = "xxxxxxxxxx",
    "aws.s3.secret_key" = "yyyyyyyyyy",
    "aws.s3.enable_partitioned_prefix" = "true"
);

SET def_volume AS DEFAULT STORAGE VOLUME;
The following example creates a storage volume def_volume for an HDFS storage, enables the storage volume, and sets it as the default storage volume:
CREATE STORAGE VOLUME def_volume
TYPE = HDFS
LOCATIONS = ("hdfs://127.0.0.1:9000/user/starrocks/");

SET def_volume AS DEFAULT STORAGE VOLUME;
In addition to the authentication methods used above, StarRocks also supports a variety of credentials to access your remote storage. See CREATE STORAGE VOLUME - Credential information for detailed instructions.
Use shared-data StarRocks
The usage of shared-data StarRocks clusters is also similar to that of a classic shared-nothing StarRocks cluster, except that the shared-data cluster uses storage volumes and cloud-native tables to store data in remote storage.
Create a database and a cloud-native table
After you create a default storage volume, you can then create a database and a cloud-native table using this storage volume.
Shared-data StarRocks clusters support all StarRocks table types.
The following example creates a database cloud_db and a table detail_demo based on Duplicate Key table type, enables the local disk cache, sets the hot data validity duration to one month, and disables asynchronous data ingestion into remote storage:
CREATE DATABASE cloud_db;
USE cloud_db;
CREATE TABLE IF NOT EXISTS detail_demo (
    recruit_date  DATE           NOT NULL COMMENT "YYYY-MM-DD",
    region_num    TINYINT        COMMENT "range [-128, 127]",
    num_plate     SMALLINT       COMMENT "range [-32768, 32767] ",
    tel           INT            COMMENT "range [-2147483648, 2147483647]",
    id            BIGINT         COMMENT "range [-2^63 + 1 ~ 2^63 - 1]",
    password      LARGEINT       COMMENT "range [-2^127 + 1 ~ 2^127 - 1]",
    name          CHAR(20)       NOT NULL COMMENT "range char(m),m in (1-255) ",
    profile       VARCHAR(500)   NOT NULL COMMENT "upper limit value 65533 bytes",
    ispass        BOOLEAN        COMMENT "true/false")
DUPLICATE KEY(recruit_date, region_num)
DISTRIBUTED BY HASH(recruit_date, region_num)
PROPERTIES (
    "storage_volume" = "def_volume",
    "datacache.enable" = "true",
    "datacache.partition_duration" = "1 MONTH"
);
NOTE
The default storage volume is used when you create a database or a cloud-native table in a shared-data StarRocks cluster if no storage volume is specified.
PROPERTIES
In addition to the regular table PROPERTIES, you need to specify the following PROPERTIES when creating a table for shared-data StarRocks cluster:
datacache.enable
Whether to enable the local disk cache.
true(Default) When this property is set totrue, the data to be loaded is simultaneously written into the remote storage and the local disk (as the cache for query acceleration).falseWhen this property is set tofalse, the data is loaded only into the remote storage.
NOTE
To enable the local disk cache, you must specify the directory of the disk in the CN configuration item
storage_root_path.
datacache.partition_duration
The validity duration of the hot data. When the local disk cache is enabled, all data is loaded into the cache. When the cache is full, StarRocks deletes the less recently used data from the cache. When a query needs to scan the deleted data, StarRocks checks if the data is within the duration of validity starting from the current time. If the data is within the duration, StarRocks loads the data into the cache again. If the data is not within the duration, StarRocks does not load it into the cache. This property is a string value that can be specified with the following units: YEAR, MONTH, DAY, and HOUR, for example, 7 DAY and 12 HOUR. If it is not specified, all data is cached as the hot data.
NOTE
This property is available only when
datacache.enableis set totrue.
View table information
You can view the information of tables in a specific database using SHOW PROC "/dbs/<db_id>". See SHOW PROC for more information.
Example:
mysql> SHOW PROC "/dbs/xxxxx";
+---------+-------------+----------+---------------------+--------------+--------+--------------+--------------------------+--------------+---------------+------------------------------+
| TableId | TableName   | IndexNum | PartitionColumnName | PartitionNum | State  | Type         | LastConsistencyCheckTime | ReplicaCount | PartitionType | StoragePath                  |
+---------+-------------+----------+---------------------+--------------+--------+--------------+--------------------------+--------------+---------------+------------------------------+
| 12003   | detail_demo | 1        | NULL                | 1            | NORMAL | CLOUD_NATIVE | NULL                     | 8            | UNPARTITIONED | s3://xxxxxxxxxxxxxx/1/12003/ |
+---------+-------------+----------+---------------------+--------------+--------+--------------+--------------------------+--------------+---------------+------------------------------+
The Type of a table in shared-data StarRocks cluster is CLOUD_NATIVE. In the field StoragePath, StarRocks returns the remote storage directory where the table is stored.
Load data into a shared-data StarRocks cluster
Shared-data StarRocks clusters support all loading methods provided by StarRocks. See Loading options for more information.
Query in a shared-data StarRocks cluster
Tables in a shared-data StarRocks cluster support all types of queries provided by StarRocks. See StarRocks SELECT for more information.
NOTE
Shared-data StarRocks clusters support synchronous materialized views from v3.4.0.
Stop the StarRocks cluster
You can stop the StarRocks cluster by running the following commands on the corresponding instances.
-
Stop an FE node.
./fe/bin/stop_fe.sh -
Stop a CN node.
./be/bin/stop_cn.sh
Troubleshooting
Try the following steps to identify the errors that occur when you start the FE or CN nodes:
-
If an FE node is not started properly, you can identify the problem by checking its log in fe/log/fe.warn.log.
cat fe/log/fe.warn.logHaving identified and resolved the problem, you must first terminate the current FE process, delete the existing meta directory, create a new metadata storage directory, and then restart the FE node with the correct configuration.
-
If a CN node is not started properly, you can identify the problem by checking its log in be/log/cn.WARNING.
cat be/log/cn.WARNINGHaving identified and resolved the problem, you must first terminate the existing CN process, and then restart the CN node with the correct configuration.
What to do next
Having deployed your StarRocks cluster, you can move on to Post-deployment Setup for instructions on initial management measures.
