StarRocks Kubernetes Operator
Automate deployment and management of a StarRocks cluster on a Kubernetes cluster with the StarRocks Kubernetes Operator.
The StarRocks k8s operator was designed to be a level 2 operator. See https://sdk.operatorframework.io/docs/overview/operator-capabilities/ to understand more about the capabilities of a level 2 operator.
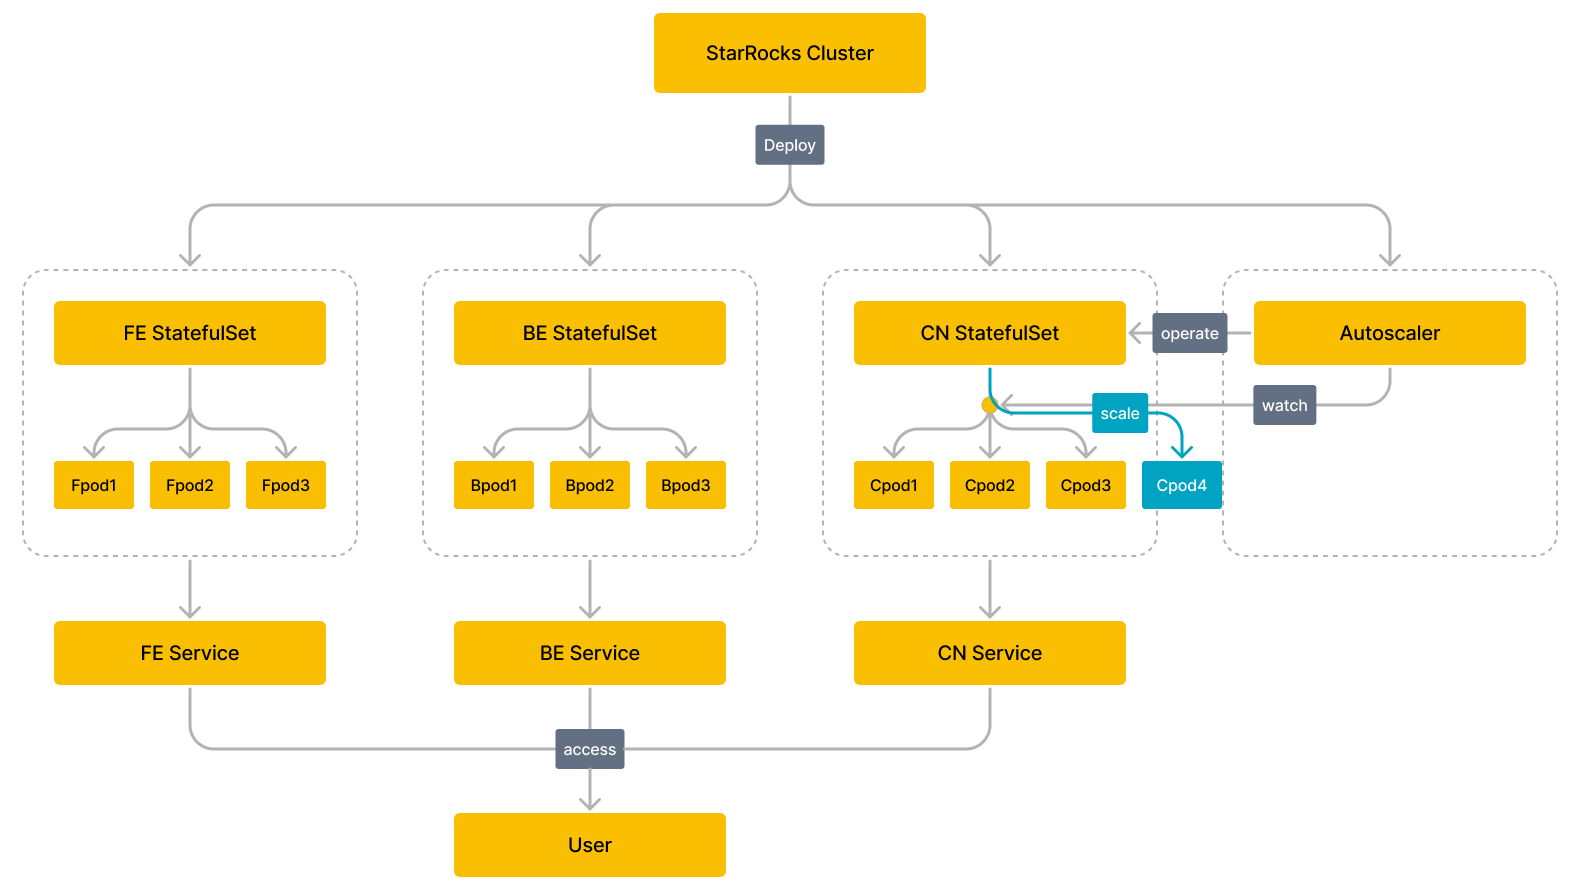
How it works
Before you begin
Create Kubernetes cluster
You can use the cloud-managed Kubernetes service, such as an Amazon Elastic Kubernetes Service (EKS) or Google Kubernetes Engine (GKE) cluster, or a self-managed Kubernetes cluster.
-
Create an Amazon EKS cluster
- Check that the following command-line tools are installed in your environment:
- Install and configure AWS command-line tool AWS CLI.
- Install EKS cluster command-line tool eksctl.
- Install the Kubernetes cluster command-line tool kubectl.
- Use one of the following methods to create an EKS cluster:
- Check that the following command-line tools are installed in your environment:
-
Create a GKE cluster
Before you start to create a GKE cluster, make sure that you complete all the prerequisites. Then follow the instructions provided in Create a GKE cluster to create a GKE cluster.
-
Create a self-managed Kubernetes cluster
Follow the instructions provided in Bootstrapping clusters with kubeadm to create a self-managed Kubernetes cluster. You can use Minikube and Docker Desktop to create a single-node private Kubernetes cluster with minimum steps.
Deploy StarRocks Kubernetes Operator
-
Add the custom resource StarRocksCluster.
kubectl apply -f https://raw.githubusercontent.com/StarRocks/starrocks-kubernetes-operator/main/deploy/starrocks.com_starrocksclusters.yaml -
Deploy the StarRocks Operator. You can choose to deploy the StarRocks Operator by using a default configuration file or a custom configuration file.
-
Deploy the StarRocks Operator by using a default configuration file.
kubectl apply -f https://raw.githubusercontent.com/StarRocks/starrocks-kubernetes-operator/main/deploy/operator.yamlThe StarRocks Operator is deployed to the namespace
starrocksand manages all StarRocks clusters under all namespaces. -
Deploy the StarRocks Operator by using a custom configuration file.
-
Download the configuration file operator.yaml, which is used to deploy the StarRocks Operator.
curl -O https://raw.githubusercontent.com/StarRocks/starrocks-kubernetes-operator/main/deploy/operator.yaml -
Modify the configuration file operator.yaml to suit your needs.
-
Deploy the StarRocks Operator.
kubectl apply -f operator.yaml
-
-
-
Check the running status of the StarRocks Operator. If the pod is in the
Runningstate and all containers inside the pod areREADY, the StarRocks Operator is running as expected.$ kubectl -n starrocks get pods
NAME READY STATUS RESTARTS AGE
starrocks-controller-65bb8679-jkbtg 1/1 Running 0 5m6s
NOTE
If you customize the namespace in which the StarRocks Operator is located, you need to replace
starrockswith the name of your customized namespace.
Deploy StarRocks Cluster
You can directly use the sample configuration files provided by StarRocks to deploy a StarRocks cluster (an object instantiated by using the custom resource StarRocks Cluster). For example, you can use starrocks-fe-and-be.yaml to deploy a StarRocks cluster that contains three FE nodes and three BE nodes.
kubectl apply -f https://raw.githubusercontent.com/StarRocks/starrocks-kubernetes-operator/main/examples/starrocks/starrocks-fe-and-be.yaml
The following table describes a few important fields in the starrocks-fe-and-be.yaml file.
| Field | Description |
|---|---|
| Kind | The resource type of the object. The value must be StarRocksCluster. |
| Metadata | Metadata, in which the following sub-fields are nested:
|
| Spec | The expected status of the object. Valid values are starRocksFeSpec, starRocksBeSpec, and starRocksCnSpec. |
You can also deploy the StarRocks cluster by using a modified configuration file. For supported fields and detailed descriptions, see api.md.
Deploying the StarRocks cluster takes a while. During this period, you can use the command kubectl -n starrocks get pods to check the starting status of the StarRocks cluster. If all the pods are in the Running state and all containers inside the pods are READY, the StarRocks cluster is running as expected.
NOTE
If you customize the namespace in which the StarRocks cluster is located, you need to replace
starrockswith the name of your customized namespace.
$ kubectl -n starrocks get pods
NAME                                  READY   STATUS    RESTARTS   AGE
starrocks-controller-65bb8679-jkbtg   1/1     Running   0          22h
starrockscluster-sample-be-0          1/1     Running   0          23h
starrockscluster-sample-be-1          1/1     Running   0          23h
starrockscluster-sample-be-2          1/1     Running   0          22h
starrockscluster-sample-fe-0          1/1     Running   0          21h
starrockscluster-sample-fe-1          1/1     Running   0          21h
starrockscluster-sample-fe-2          1/1     Running   0          22h
If some pods cannot start after a long period of time, you can use kubectl logs -n starrocks <pod_name> to view the log information or use kubectl -n starrocks describe pod <pod_name> to view the event information to locate the problem.
Manage StarRocks Cluster
Access StarRocks Cluster
The components of the StarRocks cluster can be accessed through their associated Services, such as the FE Service. For detailed descriptions of Services and their access addresses, see api.md and Services.
- Only the FE Service is deployed by default. If you need to deploy the BE Service and CN Service, you need to configure
starRocksBeSpecandstarRocksCnSpecin the StarRocks cluster configuration file. - The name of a Service is
<cluster name>-<component name>-serviceby default, for example,starrockscluster-sample-fe-service. You can also specify the Service name in the spec of each component.
Access StarRocks Cluster from within Kubernetes Cluster
From within the Kubernetes cluster, the StarRocks cluster can be accessed through the FE Service's ClusterIP.
-
Obtain the internal virtual IP address
CLUSTER-IPand portPORT(S)of the FE Service.$ kubectl -n starrocks get svc
NAME TYPE CLUSTER-IP EXTERNAL-IP PORT(S) AGE
be-domain-search ClusterIP None <none> 9050/TCP 23m
fe-domain-search ClusterIP None <none> 9030/TCP 25m
starrockscluster-sample-fe-service ClusterIP 10.100.162.xxx <none> 8030/TCP,9020/TCP,9030/TCP,9010/TCP 25m -
Access the StarRocks cluster by using the MySQL client from within the Kubernetes cluster.
mysql -h 10.100.162.xxx -P 9030 -uroot
Access StarRocks Cluster from outside Kubernetes Cluster
From outside the Kubernetes cluster, you can access the StarRocks cluster through the FE Service's LoadBalancer or NodePort. This topic uses LoadBalancer as an example:
-
Run the command
kubectl -n starrocks edit src starrockscluster-sampleto update the StarRocks cluster configuration file, and change the Service type ofstarRocksFeSpectoLoadBalancer.starRocksFeSpec:
image: starrocks/fe-ubuntu:3.0-latest
replicas: 3
requests:
cpu: 4
memory: 16Gi
service:
type: LoadBalancer # specified as LoadBalancer -
Obtain the IP address
EXTERNAL-IPand portPORT(S)that the FE Service exposes to the outside.$ kubectl -n starrocks get svc
NAME TYPE CLUSTER-IP EXTERNAL-IP PORT(S) AGE
be-domain-search ClusterIP None <none> 9050/TCP 127m
fe-domain-search ClusterIP None <none> 9030/TCP 129m
starrockscluster-sample-fe-service LoadBalancer 10.100.162.xxx a7509284bf3784983a596c6eec7fc212-618xxxxxx.us-west-2.elb.amazonaws.com 8030:30629/TCP,9020:32544/TCP,9030:32244/TCP,9010:32024/TCP 129m ClusterIP None <none> 9030/TCP 23h -
Log in to your machine host and access the StarRocks cluster by using the MySQL client.
mysql -h a7509284bf3784983a596c6eec7fc212-618xxxxxx.us-west-2.elb.amazonaws.com -P9030 -uroot
Upgrade StarRocks Cluster
Upgrade BE nodes
Run the following command to specify a new BE image file, such as starrocks/be-ubuntu:latest:
kubectl -n starrocks patch starrockscluster starrockscluster-sample --type='merge' -p '{"spec":{"starRocksBeSpec":{"image":"starrocks/be-ubuntu:latest"}}}'
Upgrade FE nodes
Run the following command to specify a new FE image file, such as starrocks/fe-ubuntu:latest:
kubectl -n starrocks patch starrockscluster starrockscluster-sample --type='merge' -p '{"spec":{"starRocksFeSpec":{"image":"starrocks/fe-ubuntu:latest"}}}'
The upgrade process lasts for a while. You can run the command kubectl -n starrocks get pods to view the upgrade progress.
Scale StarRocks cluster
Scale out BE cluster
Run the following command to scale the BE cluster to 9 nodes:
kubectl -n starrocks patch starrockscluster starrockscluster-sample --type='merge' -p '{"spec":{"starRocksBeSpec":{"replicas":9}}}'
Scale in BE cluster
When scaling in BE nodes, you need to scale them one at a time, and wait for the tablets on the BEs to be re-distributed before proceeding. If there are tables with single replicas, taking a BE node offline may cause data loss if the tablets fail to be redistributed.
Execute the following command to scale in a cluster with 10 BE nodes to 9.
kubectl -n starrocks patch starrockscluster starrockscluster-sample --type='merge' -p '{"spec":{"starRocksBeSpec":{"replicas":9}}}'
After scaling in, you must manually drop the nodes whose alive status is false.
The redistribution of tablets will take some time. You can check the progress by executing SHOW PROC '/statistic';.
Scale out FE cluster
Run the following command to scale out the FE cluster to 4 nodes:
kubectl -n starrocks patch starrockscluster starrockscluster-sample --type='merge' -p '{"spec":{"starRocksFeSpec":{"replicas":4}}}'
The scaling process lasts for a while. You can use the command kubectl -n starrocks get pods to view the scaling progress.
Automatic scaling for CN cluster
Run the command kubectl -n starrocks edit src starrockscluster-sample to configure the automatic scaling policy for the CN cluster. You can specify the resource metrics for CNs as the average CPU utilization, average memory usage, elastic scaling threshold, upper elastic scaling limit, and lower elastic scaling limit. The upper elastic scaling limit and lower elastic scaling limit specify the maximum number and minimum number of CNs allowed for elastic scaling.
If the automatic scaling policy for the CN cluster is configured, delete the replicas field from the starRocksCnSpec in the StarRocks cluster configuration file.
Kubernetes also supports using behavior to customize scaling behaviors according to business scenarios, helping you achieve rapid or slow scaling or disable scaling. For more information about automatic scaling policies, see Horizontal Pod Scaling.
The following is a template provided by StarRocks to help you configure automatic scaling policies:
  starRocksCnSpec:
    image: starrocks/cn-ubuntu:latest
    limits:
      cpu: 16
      memory: 64Gi
    requests:
      cpu: 16
      memory: 64Gi
    autoScalingPolicy: # Automatic scaling policy of the CN cluster.
      maxReplicas: 10 # The maximum number of CNs is set to 10.
      minReplicas: 1 # The minimum number of CNs is set to 1.
      # operator creates an HPA resource based on the following field.
      # see https://kubernetes.io/docs/concepts/workloads/autoscaling/horizontal-pod-autoscale/ for more information.
      hpaPolicy:
        metrics: # Resource metrics
          - type: Resource
            resource:
              name: memory  # The average memory usage of CNs is specified as a resource metric.
              target:
                # The elastic scaling threshold is 60%.
                # When the average memory utilization of CNs exceeds 60%, the number of CNs increases for scale-out.
                # When the average memory utilization of CNs is below 60%, the number of CNs decreases for scale-in.
                averageUtilization: 60
                type: Utilization
          - type: Resource
            resource:
              name: cpu # The average CPU utilization of CNs is specified as a resource metric.
              target:
                # The elastic scaling threshold is 60%.
                # When the average CPU utilization of CNs exceeds 60%, the number of CNs increases for scale-out.
                # When the average CPU utilization of CNs is below 60%, the number of CNs decreases for scale-in.
                averageUtilization: 60
                type: Utilization
        behavior: #  The scaling behavior is customized according to business scenarios, helping you achieve rapid or slow scaling or disable scaling.
          scaleUp:
            policies:
              - type: Pods
                value: 1
                periodSeconds: 10
          scaleDown:
            selectPolicy: Disabled
The following table describes a few important fields:
- The upper and lower elastic scaling limit.
maxReplicas: 10 # The maximum number of CNs is set to 10.
minReplicas: 1 # The minimum number of CNs is set to 1.
- The elastic scaling threshold.
# For example, the average CPU utilization of CNs is specified as a resource metric.
# The elastic scaling threshold is 60%.
# When the average CPU utilization of CNs exceeds 60%, the number of CNs increases for scale-out.
# When the average CPU utilization of CNs is below 60%, the number of CNs decreases for scale-in.
- type: Resource
  resource:
    name: cpu
    target:
      averageUtilization: 60
FAQ
Issue description: When a custom resource StarRocksCluster is installed using kubectl apply -f xxx, an error is returned The CustomResourceDefinition 'starrocksclusters.starrocks.com' is invalid: metadata.annotations: Too long: must have at most 262144 bytes.
Cause analysis: Whenever kubectl apply -f xxx is used to create or update resources, a metadata annotation kubectl.kubernetes.io/last-applied-configuration is added. This metadata annotation is in JSON format and records the last-applied-configuration. kubectl apply -f xxx" is suitable for most cases, but in rare situations , such as when the configuration file for the custom resource is too large, it may cause the size of the metadata annotation to exceed the limit.
Solution: If you install the custom resource StarRocksCluster for the first time, it is recommended to use kubectl create -f xxx. If the custom resource StarRocksCluster is already installed in the environment, and you need to update its configuration, it is recommended to use kubectl replace -f xxx.
