S3 Load
Load data from AWS S3
StarRocks provides the following options for loading data from AWS S3:
- Synchronous loading using INSERT+
FILES() - Asynchronous loading using Broker Load
- Continuous asynchronous loading using Pipe
Each of these options has its own advantages, which are detailed in the following sections.
In most cases, we recommend that you use the INSERT+FILES() method, which is much easier to use.
However, the INSERT+FILES() method currently supports only the Parquet, ORC, and CSV file formats. Therefore, if you need to load data of other file formats such as JSON, or perform data changes such as DELETE during data loading, you can resort to Broker Load.
If you need to load a large number of data files with a significant data volume in total (for example, more than 100 GB or even 1 TB), we recommend that you use the Pipe method. Pipe can split the files based on their number or size, breaking down the load job into smaller, sequential tasks. This approach ensures that errors in one file do not impact the entire load job and minimizes the need for retries due to data errors.
Before you begin
Make source data ready
Make sure the source data you want to load into StarRocks is properly stored in an S3 bucket. You may also consider where the data and the database are located, because data transfer costs are much lower when your bucket and your StarRocks cluster are located in the same region.
In this topic, we provide you with a sample dataset in an S3 bucket, s3://starrocks-examples/user-behavior-10-million-rows.parquet. You can access that dataset with any valid credentials as the object is readable by any AWS authenticated user.
Check privileges
You can load data into StarRocks tables only as a user who has the INSERT privilege on those StarRocks tables. If you do not have the INSERT privilege, follow the instructions provided in GRANT to grant the INSERT privilege to the user that you use to connect to your StarRocks cluster. The syntax is GRANT INSERT ON TABLE <table_name> IN DATABASE <database_name> TO { ROLE <role_name> | USER <user_identity>}.
Gather authentication details
The examples in this topic use IAM user-based authentication. To ensure that you have permission to read data from AWS S3, we recommend that you read Preparation for IAM user-based authentication and follow the instructions to create an IAM user with proper IAM policies configured.
In a nutshell, if you practice IAM user-based authentication, you need to gather information about the following AWS resources:
- The S3 bucket that stores your data.
- The S3 object key (object name) if accessing a specific object in the bucket. Note that the object key can include a prefix if your S3 objects are stored in sub-folders.
- The AWS region to which the S3 bucket belongs.
- The access key and secret key used as access credentials.
For information about all the authentication methods available, see Authenticate to AWS resources.
Use INSERT+FILES()
This method is available from v3.1 onwards and currently supports only the Parquet, ORC, and CSV (from v3.3.0 onwards) file formats.
Advantages of INSERT+FILES()
FILES() can read the file stored in cloud storage based on the path-related properties you specify, infer the table schema of the data in the file, and then return the data from the file as data rows.
With FILES(), you can:
- Query the data directly from S3 using SELECT.
- Create and load a table using CREATE TABLE AS SELECT (CTAS).
- Load the data into an existing table using INSERT.
Typical examples
Querying directly from S3 using SELECT
Querying directly from S3 using SELECT+FILES() can give a good preview of the content of a dataset before you create a table. For example:
- Get a preview of the dataset without storing the data.
- Query for the min and max values and decide what data types to use.
- Check for
NULLvalues.
The following example queries the sample dataset s3://starrocks-examples/user-behavior-10-million-rows.parquet:
SELECT * FROM FILES
(
    "path" = "s3://starrocks-examples/user-behavior-10-million-rows.parquet",
    "format" = "parquet",
    "aws.s3.region" = "us-east-1",
    "aws.s3.access_key" = "AAAAAAAAAAAAAAAAAAAA",
    "aws.s3.secret_key" = "BBBBBBBBBBBBBBBBBBBBBBBBBBBBBBBBBBBBBBBB"
)
LIMIT 3;
NOTE
Substitute your credentials for
AAAandBBBin the above command. Any validaws.s3.access_keyandaws.s3.secret_keycan be used, as the object is readable by any AWS authenticated user.
The system returns the following query result:
+--------+---------+------------+--------------+---------------------+
| UserID | ItemID  | CategoryID | BehaviorType | Timestamp           |
+--------+---------+------------+--------------+---------------------+
|      1 | 2576651 |     149192 | pv           | 2017-11-25 01:21:25 |
|      1 | 3830808 |    4181361 | pv           | 2017-11-25 07:04:53 |
|      1 | 4365585 |    2520377 | pv           | 2017-11-25 07:49:06 |
+--------+---------+------------+--------------+---------------------+
NOTE
Notice that the column names as returned above are provided by the Parquet file.
Creating and loading a table using CTAS
This is a continuation of the previous example. The previous query is wrapped in CREATE TABLE AS SELECT (CTAS) to automate the table creation using schema inference. This means StarRocks will infer the table schema, create the table you want, and then load the data into the table. The column names and types are not required to create a table when using the FILES() table function with Parquet files as the Parquet format includes the column names.
NOTE
The syntax of CREATE TABLE when using schema inference does not allow setting the number of replicas, so set it before creating the table. The example below is for a system with one replica:
ADMIN SET FRONTEND CONFIG ('default_replication_num' = "1");
Create a database and switch to it:
CREATE DATABASE IF NOT EXISTS mydatabase;
USE mydatabase;
Use CTAS to create a table and load the data of the sample dataset s3://starrocks-examples/user-behavior-10-million-rows.parquet into the table:
CREATE TABLE user_behavior_inferred AS
SELECT * FROM FILES
(
    "path" = "s3://starrocks-examples/user-behavior-10-million-rows.parquet",
    "format" = "parquet",
    "aws.s3.region" = "us-east-1",
    "aws.s3.access_key" = "AAAAAAAAAAAAAAAAAAAA",
    "aws.s3.secret_key" = "BBBBBBBBBBBBBBBBBBBBBBBBBBBBBBBBBBBBBBBB"
);
NOTE
Substitute your credentials for
AAAandBBBin the above command. Any validaws.s3.access_keyandaws.s3.secret_keycan be used, as the object is readable by any AWS authenticated user.
After creating the table, you can view its schema by using DESCRIBE:
DESCRIBE user_behavior_inferred;
The system returns the following query result:
+--------------+------------------+------+-------+---------+-------+
| Field        | Type             | Null | Key   | Default | Extra |
+--------------+------------------+------+-------+---------+-------+
| UserID       | bigint           | YES  | true  | NULL    |       |
| ItemID       | bigint           | YES  | true  | NULL    |       |
| CategoryID   | bigint           | YES  | true  | NULL    |       |
| BehaviorType | varchar(1048576) | YES  | false | NULL    |       |
| Timestamp    | varchar(1048576) | YES  | false | NULL    |       |
+--------------+------------------+------+-------+---------+-------+
Query the table to verify that the data has been loaded into it. Example:
SELECT * from user_behavior_inferred LIMIT 3;
The following query result is returned, indicating that the data has been successfully loaded:
+--------+---------+------------+--------------+---------------------+
| UserID | ItemID  | CategoryID | BehaviorType | Timestamp           |
+--------+---------+------------+--------------+---------------------+
| 225586 | 3694958 |    1040727 | pv           | 2017-12-01 00:58:40 |
| 225586 | 3726324 |     965809 | pv           | 2017-12-01 02:16:02 |
| 225586 | 3732495 |    1488813 | pv           | 2017-12-01 00:59:46 |
+--------+---------+------------+--------------+---------------------+
Loading into an existing table using INSERT
You may want to customize the table that you are inserting into, for example, the:
- column data type, nullable setting, or default values
- key types and columns
- data partitioning and bucketing
NOTE
Creating the most efficient table structure requires knowledge of how the data will be used and the content of the columns. This topic does not cover table design. For information about table design, see Table types.
In this example, we are creating a table based on knowledge of how the table will be queried and the data in the Parquet file. The knowledge of the data in the Parquet file can be gained by querying the file directly in S3.
- Since a query of the dataset in S3 indicates that the
Timestampcolumn contains data that matches a VARCHAR data type, and StarRocks can cast from VARCHAR to DATETIME, the data type is changed to DATETIME in the following DDL. - By querying the data in S3, you can find that there are no
NULLvalues in the dataset, so the DDL could also set all columns as non-nullable. - Based on knowledge of the expected query types, the sort key and bucketing column are set to the column
UserID. Your use case might be different for this data, so you might decide to useItemIDin addition to, or instead of,UserIDfor the sort key.
Create a database and switch to it:
CREATE DATABASE IF NOT EXISTS mydatabase;
USE mydatabase;
Create a table by hand:
CREATE TABLE user_behavior_declared
(
    UserID int(11),
    ItemID int(11),
    CategoryID int(11),
    BehaviorType varchar(65533),
    Timestamp datetime
)
ENGINE = OLAP
DUPLICATE KEY(UserID)
DISTRIBUTED BY HASH(UserID);
Display the schema so that you can compare it with the inferred schema produced by the FILES() table function:
DESCRIBE user_behavior_declared;
+--------------+----------------+------+-------+---------+-------+
| Field        | Type           | Null | Key   | Default | Extra |
+--------------+----------------+------+-------+---------+-------+
| UserID       | int            | YES  | true  | NULL    |       |
| ItemID       | int            | YES  | false | NULL    |       |
| CategoryID   | int            | YES  | false | NULL    |       |
| BehaviorType | varchar(65533) | YES  | false | NULL    |       |
| Timestamp    | datetime       | YES  | false | NULL    |       |
+--------------+----------------+------+-------+---------+-------+
Compare the schema you just created with the schema inferred earlier using the FILES() table function. Look at:
- data types
- nullable
- key fields
To better control the schema of the destination table and for better query performance, we recommend that you specify the table schema by hand in production environments.
After creating the table, you can load it with INSERT INTO SELECT FROM FILES():
INSERT INTO user_behavior_declared
SELECT * FROM FILES
(
    "path" = "s3://starrocks-examples/user-behavior-10-million-rows.parquet",
    "format" = "parquet",
    "aws.s3.region" = "us-east-1",
    "aws.s3.access_key" = "AAAAAAAAAAAAAAAAAAAA",
    "aws.s3.secret_key" = "BBBBBBBBBBBBBBBBBBBBBBBBBBBBBBBBBBBBBBBB"
);
NOTE
Substitute your credentials for
AAAandBBBin the above command. Any validaws.s3.access_keyandaws.s3.secret_keycan be used, as the object is readable by any AWS authenticated user.
After the load is complete, you can query the table to verify that the data has been loaded into it. Example:
SELECT * from user_behavior_declared LIMIT 3;
The following query result is returned, indicating that the data has been successfully loaded:
+--------+---------+------------+--------------+---------------------+
| UserID | ItemID  | CategoryID | BehaviorType | Timestamp           |
+--------+---------+------------+--------------+---------------------+
| 393529 | 3715112 |     883960 | pv           | 2017-12-02 02:45:44 |
| 393529 | 2650583 |     883960 | pv           | 2017-12-02 02:45:59 |
| 393529 | 3715112 |     883960 | pv           | 2017-12-02 03:00:56 |
+--------+---------+------------+--------------+---------------------+
Check load progress
You can query the progress of INSERT jobs from the loads view in the StarRocks Information Schema. This feature is supported from v3.1 onwards. Example:
SELECT * FROM information_schema.loads ORDER BY JOB_ID DESC;
For information about the fields provided in the loads view, see loads.
If you have submitted multiple load jobs, you can filter on the LABEL associated with the job. Example:
SELECT * FROM information_schema.loads WHERE LABEL = 'insert_e3b882f5-7eb3-11ee-ae77-00163e267b60' \G
*************************** 1. row ***************************
              JOB_ID: 10243
               LABEL: insert_e3b882f5-7eb3-11ee-ae77-00163e267b60
       DATABASE_NAME: mydatabase
               STATE: FINISHED
            PROGRESS: ETL:100%; LOAD:100%
                TYPE: INSERT
            PRIORITY: NORMAL
           SCAN_ROWS: 10000000
       FILTERED_ROWS: 0
     UNSELECTED_ROWS: 0
           SINK_ROWS: 10000000
            ETL_INFO:
           TASK_INFO: resource:N/A; timeout(s):300; max_filter_ratio:0.0
         CREATE_TIME: 2023-11-09 11:56:01
      ETL_START_TIME: 2023-11-09 11:56:01
     ETL_FINISH_TIME: 2023-11-09 11:56:01
     LOAD_START_TIME: 2023-11-09 11:56:01
    LOAD_FINISH_TIME: 2023-11-09 11:56:44
         JOB_DETAILS: {"All backends":{"e3b882f5-7eb3-11ee-ae77-00163e267b60":[10142]},"FileNumber":0,"FileSize":0,"InternalTableLoadBytes":311710786,"InternalTableLoadRows":10000000,"ScanBytes":581574034,"ScanRows":10000000,"TaskNumber":1,"Unfinished backends":{"e3b882f5-7eb3-11ee-ae77-00163e267b60":[]}}
           ERROR_MSG: NULL
        TRACKING_URL: NULL
        TRACKING_SQL: NULL
REJECTED_RECORD_PATH: NULL
NOTE
INSERT is a synchronous command. If an INSERT job is still running, you need to open another session to check its execution status.
Use Broker Load
An asynchronous Broker Load process handles making the connection to S3, pulling the data, and storing the data in StarRocks.
This method supports the following file formats:
- Parquet
- ORC
- CSV
- JSON (supported from v3.2.3 onwards)
Advantages of Broker Load
- Broker Load runs in the background and clients do not need to stay connected for the job to continue.
- Broker Load is preferred for long-running jobs, with the default timeout spanning 4 hours.
- In addition to Parquet and ORC file format, Broker Load supports CSV file format and JSON file format (JSON file format is supported from v3.2.3 onwards).
Data flow
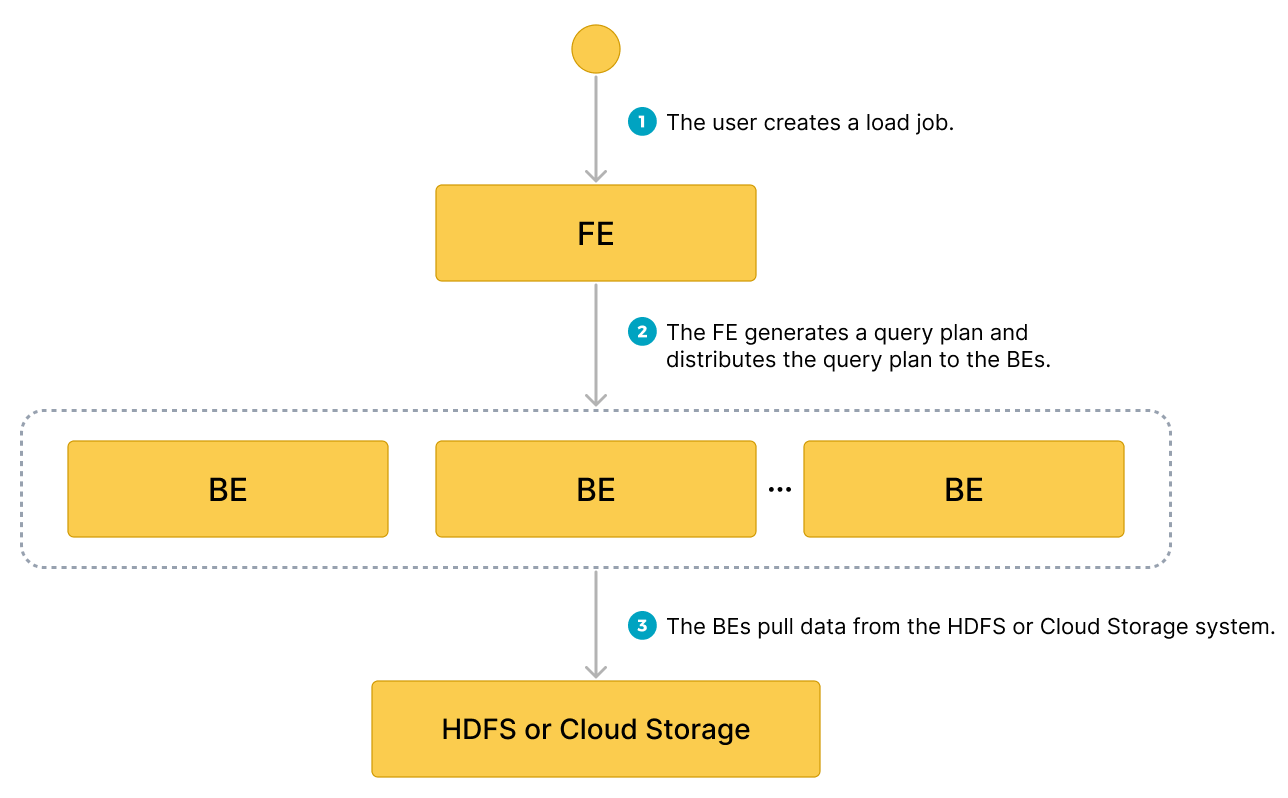
- The user creates a load job.
- The frontend (FE) creates a query plan and distributes the plan to the backend nodes (BEs) or compute nodes (CNs).
- The BEs or CNs pull the data from the source and load the data into StarRocks.
Typical example
Create a table, start a load process that pulls the sample dataset s3://starrocks-examples/user-behavior-10-million-rows.parquet from S3, and verify the progress and success of the data loading.
Create a database and a table
Create a database and switch to it:
CREATE DATABASE IF NOT EXISTS mydatabase;
USE mydatabase;
Create a table by hand (we recommend that the table has the same schema as the Parquet file that you want to load from AWS S3):
CREATE TABLE user_behavior
(
    UserID int(11),
    ItemID int(11),
    CategoryID int(11),
    BehaviorType varchar(65533),
    Timestamp datetime
)
ENGINE = OLAP
DUPLICATE KEY(UserID)
DISTRIBUTED BY HASH(UserID);
Start a Broker Load
Run the following command to start a Broker Load job that loads data from the sample dataset s3://starrocks-examples/user-behavior-10-million-rows.parquet to the user_behavior table:
LOAD LABEL user_behavior
(
    DATA INFILE("s3://starrocks-examples/user-behavior-10-million-rows.parquet")
    INTO TABLE user_behavior
    FORMAT AS "parquet"
 )
 WITH BROKER
 (
    "aws.s3.enable_ssl" = "true",
    "aws.s3.use_instance_profile" = "false",
    "aws.s3.region" = "us-east-1",
    "aws.s3.access_key" = "AAAAAAAAAAAAAAAAAAAA",
    "aws.s3.secret_key" = "BBBBBBBBBBBBBBBBBBBBBBBBBBBBBBBBBBBBBBBB"
 )
PROPERTIES
(
    "timeout" = "72000"
);
NOTE
Substitute your credentials for
AAAandBBBin the above command. Any validaws.s3.access_keyandaws.s3.secret_keycan be used, as the object is readable by any AWS authenticated user.
This job has four main sections:
LABEL: A string used when querying the state of the load job.LOADdeclaration: The source URI, source data format, and destination table name.BROKER: The connection details for the source.PROPERTIES: The timeout value and any other properties to apply to the load job.
For detailed syntax and parameter descriptions, see BROKER LOAD.
Check load progress
You can query the progress of the Broker Load job from the loads view in the StarRocks Information Schema. This feature is supported from v3.1 onwards.
SELECT * FROM information_schema.loads WHERE LABEL = 'user_behavior';
For information about the fields provided in the loads view, see loads.
This record shows a state of LOADING, and the progress is 39%. If you see something similar, then run the command again until you see a state of FINISHED.
              JOB_ID: 10466
               LABEL: user_behavior
       DATABASE_NAME: mydatabase
               STATE: LOADING
            PROGRESS: ETL:100%; LOAD:39%
                TYPE: BROKER
            PRIORITY: NORMAL
           SCAN_ROWS: 4620288
       FILTERED_ROWS: 0
     UNSELECTED_ROWS: 0
           SINK_ROWS: 4620288
            ETL_INFO:
           TASK_INFO: resource:N/A; timeout(s):72000; max_filter_ratio:0.0
         CREATE_TIME: 2024-02-28 22:11:36
      ETL_START_TIME: 2024-02-28 22:11:41
     ETL_FINISH_TIME: 2024-02-28 22:11:41
     LOAD_START_TIME: 2024-02-28 22:11:41
    LOAD_FINISH_TIME: NULL
         JOB_DETAILS: {"All backends":{"2fb97223-b14c-404b-9be1-83aa9b3a7715":[10004]},"FileNumber":1,"FileSize":136901706,"InternalTableLoadBytes":144032784,"InternalTableLoadRows":4620288,"ScanBytes":143969616,"ScanRows":4620288,"TaskNumber":1,"Unfinished backends":{"2fb97223-b14c-404b-9be1-83aa9b3a7715":[10004]}}
           ERROR_MSG: NULL
        TRACKING_URL: NULL
        TRACKING_SQL: NULL
REJECTED_RECORD_PATH: NULL
After you confirm that the load job has finished, you can check a subset of the destination table to see if the data has been successfully loaded. Example:
SELECT * from user_behavior LIMIT 3;
The following query result is returned, indicating that the data has been successfully loaded:
+--------+---------+------------+--------------+---------------------+
| UserID | ItemID  | CategoryID | BehaviorType | Timestamp           |
+--------+---------+------------+--------------+---------------------+
|     34 |  856384 |    1029459 | pv           | 2017-11-27 14:43:27 |
|     34 | 5079705 |    1029459 | pv           | 2017-11-27 14:44:13 |
|     34 | 4451615 |    1029459 | pv           | 2017-11-27 14:45:52 |
+--------+---------+------------+--------------+---------------------+
Use Pipe
Starting from v3.2, StarRocks provides the Pipe loading method, which currently supports only the Parquet and ORC file formats.
Advantages of Pipe
Pipe is ideal for continuous data loading and large-scale data loading:
-
Large-scale data loading in micro-batches helps reduce the cost of retries caused by data errors.
With the help of Pipe, StarRocks enables the efficient loading of a large number of data files with a significant data volume in total. Pipe automatically splits the files based on their number or size, breaking down the load job into smaller, sequential tasks. This approach ensures that errors in one file do not impact the entire load job. The load status of each file is recorded by Pipe, allowing you to easily identify and fix files that contain errors. By minimizing the need for retries due to data errors, this approach helps to reduce costs.
-
Continuous data loading helps reduce manpower.
Pipe helps you write new or updated data files to a specific location and continuously load the new data from these files into StarRocks. After you create a Pipe job with
"AUTO_INGEST" = "TRUE"specified, it will constantly monitor changes to the data files stored in the specified path and automatically load new or updated data from the data files into the destination StarRocks table.
Additionally, Pipe performs file uniqueness checks to help prevent duplicate data loading.During the loading process, Pipe checks the uniqueness of each data file based on the file name and digest. If a file with a specific file name and digest has already been processed by a Pipe job, the Pipe job will skip all subsequent files with the same file name and digest. Note that object storage like AWS S3 uses ETag as file digest.
The load status of each data file is recorded and saved to the information_schema.pipe_files view. After a Pipe job associated with the view is deleted, the records about the files loaded in that job will also be deleted.
Data flow
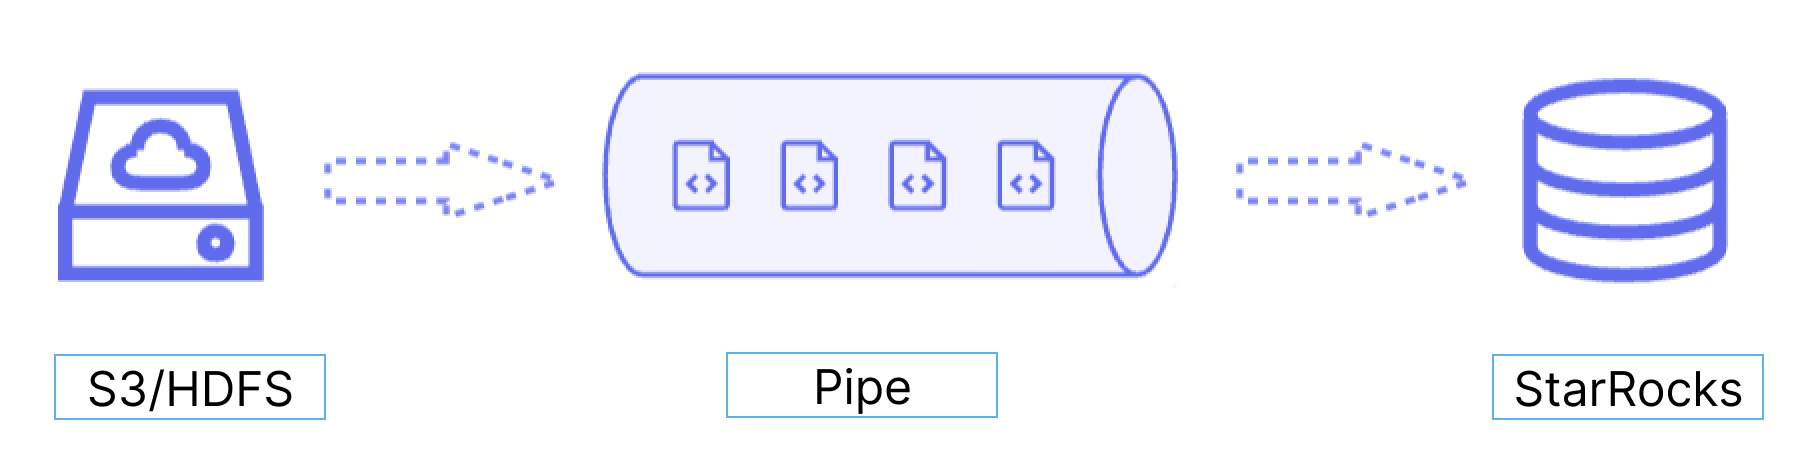
Pipe is ideal for continuous data loading and large-scale data loading:
-
Large-scale data loading in micro-batches helps reduce the cost of retries caused by data errors.
With the help of Pipe, StarRocks enables the efficient loading of a large number of data files with a significant data volume in total. Pipe automatically splits the files based on their number or size, breaking down the load job into smaller, sequential tasks. This approach ensures that errors in one file do not impact the entire load job. The load status of each file is recorded by Pipe, allowing you to easily identify and fix files that contain errors. By minimizing the need for retries due to data errors, this approach helps to reduce costs.
-
Continuous data loading helps reduce manpower.
Pipe helps you write new or updated data files to a specific location and continuously load the new data from these files into StarRocks. After you create a Pipe job with
"AUTO_INGEST" = "TRUE"specified, it will constantly monitor changes to the data files stored in the specified path and automatically load new or updated data from the data files into the destination StarRocks table.
Additionally, Pipe performs file uniqueness checks to help prevent duplicate data loading.During the loading process, Pipe checks the uniqueness of each data file based on the file name and digest. If a file with a specific file name and digest has already been processed by a Pipe job, the Pipe job will skip all subsequent files with the same file name and digest. Note that object storage like AWS S3 uses ETag as file digest.
The load status of each data file is recorded and saved to the information_schema.pipe_files view. After a Pipe job associated with the view is deleted, the records about the files loaded in that job will also be deleted.
Differences between Pipe and INSERT+FILES()
A Pipe job is split into one or more transactions based on the size and number of rows in each data file. Users can query the intermediate results during the loading process. In contrast, an INSERT+FILES() job is processed as a single transaction, and users are unable to view the data during the loading process.
File loading sequence
For each Pipe job, StarRocks maintains a file queue, from which it fetches and loads data files as micro-batches. Pipe does not ensure that the data files are loaded in the same order as they are uploaded. Therefore, newer data may be loaded prior to older data.
Typical example
Create a database and a table
Create a database and switch to it:
CREATE DATABASE IF NOT EXISTS mydatabase;
USE mydatabase;
Create a table by hand (we recommend that the table have the same schema as the Parquet file you want to load from AWS S3):
CREATE TABLE user_behavior_from_pipe
(
    UserID int(11),
    ItemID int(11),
    CategoryID int(11),
    BehaviorType varchar(65533),
    Timestamp datetime
)
ENGINE = OLAP
DUPLICATE KEY(UserID)
DISTRIBUTED BY HASH(UserID);
Start a Pipe job
Run the following command to start a Pipe job that loads data from the sample dataset s3://starrocks-examples/user-behavior-10-million-rows/ to the user_behavior_from_pipe table. This pipe job uses both micro batches, and continuous loading (described above) pipe-specific features.
The other examples in this guide load a single Parquet file with 10 million rows. For the pipe example, the same dataset is split into 57 separate files, and these are all stored in one S3 folder. Note in the CREATE PIPE command below the path is the URI for an S3 folder and rather than providing a filename the URI ends in /*. By setting AUTO_INGEST and specifying a folder rather than an individual file the pipe job will poll the S3 folder for new files and ingest them as they are added to the folder.
CREATE PIPE user_behavior_pipe
PROPERTIES
(
    "AUTO_INGEST" = "TRUE"
)
AS
INSERT INTO user_behavior_from_pipe
SELECT * FROM FILES
(
    "path" = "s3://starrocks-examples/user-behavior-10-million-rows/*",
    "format" = "parquet",
    "aws.s3.region" = "us-east-1",
    "aws.s3.access_key" = "AAAAAAAAAAAAAAAAAAAA",
    "aws.s3.secret_key" = "BBBBBBBBBBBBBBBBBBBBBBBBBBBBBBBBBBBBBBBB"
);
NOTE
Substitute your credentials for
AAAandBBBin the above command. Any validaws.s3.access_keyandaws.s3.secret_keycan be used, as the object is readable by any AWS authenticated user.
This job has four main sections:
pipe_name: The name of the pipe. The pipe name must be unique within the database to which the pipe belongs.INSERT_SQL: The INSERT INTO SELECT FROM FILES statement that is used to load data from the specified source data file to the destination table.PROPERTIES: A set of optional parameters that specify how to execute the pipe. These includeAUTO_INGEST,POLL_INTERVAL,BATCH_SIZE, andBATCH_FILES. Specify these properties in the"key" = "value"format.
For detailed syntax and parameter descriptions, see CREATE PIPE.
Check load progress
-
Query the progress of the Pipe job by using SHOW PIPES in the current database to which the Pipe job belongs.
SHOW PIPES WHERE NAME = 'user_behavior_pipe' \GThe following result is returned:
tipIn the output shown below the pipe is in the
RUNNINGstate. A pipe will stay in theRUNNINGstate until you manually stop it. The output also shows the number of files loaded (57) and the last time that a file was loaded.*************************** 1. row ***************************
DATABASE_NAME: mydatabase
PIPE_ID: 10476
PIPE_NAME: user_behavior_pipe
STATE: RUNNING
TABLE_NAME: mydatabase.user_behavior_from_pipe
LOAD_STATUS: {"loadedFiles":57,"loadedBytes":295345637,"loadingFiles":0,"lastLoadedTime":"2024-02-28 22:14:19"}
LAST_ERROR: NULL
CREATED_TIME: 2024-02-28 22:13:41
1 row in set (0.02 sec) -
Query the progress of the Pipe job from the
pipesview in the StarRocks Information Schema.SELECT * FROM information_schema.pipes WHERE pipe_name = 'user_behavior_replica' \GThe following result is returned:
tipSome of the queries in this guide end in
\Ginstead of a semicolon (;). This causes the MySQL client to output the results in vertical format. If you are using DBeaver or another client you may need to use a semicolon (;) rather than\G.*************************** 1. row ***************************
DATABASE_NAME: mydatabase
PIPE_ID: 10217
PIPE_NAME: user_behavior_replica
STATE: RUNNING
TABLE_NAME: mydatabase.user_behavior_replica
LOAD_STATUS: {"loadedFiles":1,"loadedBytes":132251298,"loadingFiles":0,"lastLoadedTime":"2023-11-09 15:35:42"}
LAST_ERROR:
CREATED_TIME: 9891-01-15 07:51:45
1 row in set (0.01 sec)
Check file status
You can query the load status of the files loaded from the pipe_files view in the StarRocks Information Schema.
SELECT * FROM information_schema.pipe_files WHERE pipe_name = 'user_behavior_replica' \G
The following result is returned:
*************************** 1. row ***************************
   DATABASE_NAME: mydatabase
         PIPE_ID: 10217
       PIPE_NAME: user_behavior_replica
       FILE_NAME: s3://starrocks-examples/user-behavior-10-million-rows.parquet
    FILE_VERSION: e29daa86b1120fea58ad0d047e671787-8
       FILE_SIZE: 132251298
   LAST_MODIFIED: 2023-11-06 13:25:17
      LOAD_STATE: FINISHED
     STAGED_TIME: 2023-11-09 15:35:02
 START_LOAD_TIME: 2023-11-09 15:35:03
FINISH_LOAD_TIME: 2023-11-09 15:35:42
       ERROR_MSG:
1 row in set (0.03 sec)
Manage Pipe jobs
You can alter, suspend or resume, drop, or query the pipes you have created and retry to load specific data files. For more information, see ALTER PIPE, SUSPEND or RESUME PIPE, DROP PIPE, SHOW PIPES, and RETRY FILE.
