StarRocks Migration Tool (SMT)
StarRocks Migration Tool (SMT) is a data migration tool provided by StarRocks to load data from source databases through Flink into StarRocks. SMT mainly can:
- Generate statements to create tables in StarRocks based on information of the source database and the target StarRocks cluster.
- Generate SQL statements that can be executed in Flink's SQL client to submit Flink jobs for synchronizing data, which simplifies full or incremental data synchronization in the pipeline. Currently, SMT supports the following source databases:
| Source database | Generate statement to create table in StarRocks | Full data synchronization | Incremental data synchronization |
|---|---|---|---|
| MySQL | Supported | Supported | Supported |
| PostgreSQL | Supported | Supported | Supported |
| Oracle | Supported | Supported | Supported |
| Hive | Supported | Supported | Not supported |
| ClickHouse | Supported | Supported | Not supported |
| SQL Server | Supported | Supported | Supported |
| TiDB | Supported | Supported | Supported |
Download link: https://cdn-thirdparty.starrocks.com/smt.tar.gz?r=2
Steps to use SMT
The generally involved steps are as follows:
-
Configure the conf/config_prod.conf file.
-
Execute starrocks-migration-tool.
-
After execution, the SQL scripts are generated in the result directory by default.
You can then use the SQL scripts in the result directory for metadata or data synchronization.
Configurations of SMT
-
[db]: information to connect the data source. Configure the information to connect the data source corresponding to the database type specified in thetypepatameter. -
[other]: additional configurations. It is recommended to specify the actual number of BE nodes in thebe_numpatameter. -
flink.starrocks.sink.*: configurations of flink-connector-starrocks. For detailed configurations and description, see configuration description. -
[table-rule.1]: rule to match tables in the data source. The CREATE TABLE statement is generated based on the regular expressions configured in the rule to match the names of databases and tables in data source. Multiple rules can be configured, and each rule generates a corresponding result file, for example:[table-rule.1]->result/starrocks-create.1.sql[table-rule.2]->result/starrocks-create.2.sql
Each rule needs to contain the configurations of database, table, and flink-connector-starrocks.
[table-rule.1]
# pattern to match databases for setting properties
database = ^ database1.*$
# pattern to match tables for setting properties
table = ^.*$
schema = ^.*$
############################################
### flink sink configurations
### DO NOT set `connector`, `table-name`, `database-name`, they are auto-generated
############################################
flink.starrocks.jdbc-url=jdbc:mysql://192.168.1.1:9030
flink.starrocks.load-url= 192.168.1.1:8030
flink.starrocks.username=root
flink.starrocks.password=
flink.starrocks.sink.max-retries=10
flink.starrocks.sink.buffer-flush.interval-ms=15000
flink.starrocks.sink.properties.format=json
flink.starrocks.sink.properties.strip_outer_array=true

[table-rule.2]
# pattern to match databases for setting properties
database = ^database2.*$
# pattern to match tables for setting properties
table = ^.*$
schema = ^.*$
############################################
### flink sink configurations
### DO NOT set `connector`, `table-name`, `database-name`, they are auto-generated
############################################
flink.starrocks.jdbc-url=jdbc:mysql://192.168.1.1:9030
flink.starrocks.load-url= 192.168.1.1:8030
flink.starrocks.username=root
flink.starrocks.password=
flink.starrocks.sink.max-retries=10
flink.starrocks.sink.buffer-flush.interval-ms=15000
flink.starrocks.sink.properties.format=json
flink.starrocks.sink.properties.strip_outer_array=true -
A separate rule can be configured for a large table that is split into shards in databases. For example, suppose that the two databases
edu_db_1andedu_db_2contain the tablescourse_1andcourse_2respectively, and these two tables have the same structure. You can use the following rule to load data from these two tables into one StarRocks table for analysis.[table-rule.3]
# pattern to match databases for setting properties
database = ^edu_db_[0-9]*$
# pattern to match tables for setting properties
table = ^course_[0-9]*$
schema = ^.*$This rule will automatically form a many-to-one loading relationship. The default name of the table that will be generated in StarRocks is
course__auto_shard, and you can also modify the table name in the related SOL script, such asresult/starrocks-create.3.sql.
Synchronize MySQL to StarRocks
Introduction
Flink CDC connector and SMT can synchronize data from MySQL within subsecond.
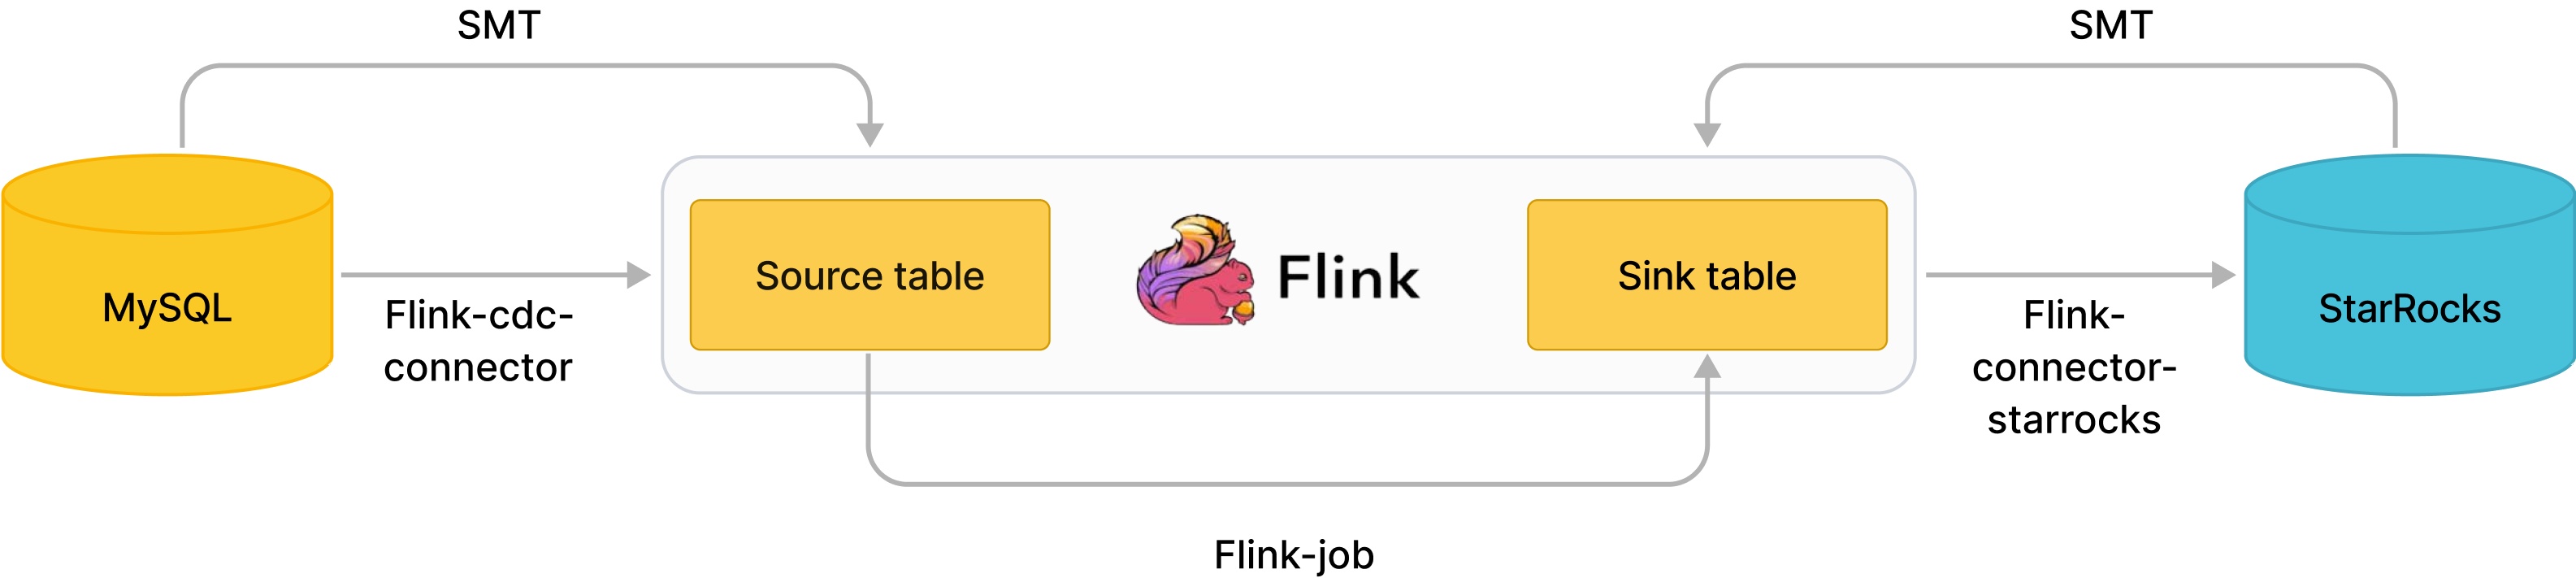
As shown in the image, SMT can automatically generate CREATE TABLE statements of the Flink's source and sink tables based on the cluster information and table structure of MySQL and StarRocks. Flink CDC connector reads the MySQL Binlog and Flink-connector-starrocks writes data to StarRocks .
Steps
| Dependency | Package name | Download link |
|---|---|---|
| Flink | flink-x.x.x-bin-scala_2.12.tgz | Flink |
| Flink CDC connector | flink-sql-connector-mysql-cdc-x.x.x.jar | Flink CDC connector |
| Flink-connector-starrocks | flink-connector-starrocks-x.x.x_flink-x.x.jar | Flink connector for StarRocks |
| SMT | smt.tar.gz | SMT |
-
Download Flink. Flink 1.11 or later is supported.
-
Download Flink CDC connector. Make sure that you download the
flink-sql-connector-mysql-cdc-xxx.jarcorresponding to the version of Flink. -
Download Flink-connector-starrocks.
-
Copy flink-sql-connector-mysql-cdc-xxx.jar and flink-connector-starrocks-xxx.jar to flink-xxx/lib/.
-
Download smt.tar.gz.
-
Extract and modify the configuration file of SMT.
[db]
host = 192.168.1.1
port = 3306
user = root
password =
type = mysql

[other]
# number of backends in StarRocks
be_num = 3
# `decimal_v3` is supported since StarRocks-1.18.1
use_decimal_v3 = false
# directory to save the converted DDL SQL
output_dir = ./result

[table-rule.1]
# pattern to match databases for setting properties
database = ^db$
# pattern to match tables for setting properties
table = ^table$
schema = ^.*$

############################################
### flink sink configurations
### DO NOT set `connector`, `table-name`, `database-name`, they are auto-generated
############################################
flink.starrocks.jdbc-url=jdbc:mysql://192.168.1.1:9030
flink.starrocks.load-url= 192.168.1.1:8030
flink.starrocks.username=root
flink.starrocks.password=
flink.starrocks.sink.max-retries=10
flink.starrocks.sink.buffer-flush.interval-ms=15000
flink.starrocks.sink.properties.format=json
flink.starrocks.sink.properties.strip_outer_array=true -
Execute starrocks-migrate-tool. All SQL scripts are generated in the result directory.
$./starrocks-migrate-tool
$ls result
flink-create.1.sql    smt.tar.gz              starrocks-create.all.sql
flink-create.all.sql starrocks-create.1.sql starrocks-external-create.all.sql -
Use a SQL script whose prefix is starrocks-create to generate the table in StarRocks.
mysql -hxx.xx.xx.x -P9030 -uroot -p < starrocks-create.all.sql -
Use a SQL script whose prefix is flink-create to generate the Flink source and sink tables, and start a Flink job to synchronize data.
bin/sql-client.sh embedded < flink-create.all.sqlAfter the above command is successfully executed, the Flink job to synchronize data keeps running.
-
Observe the status of the Flink job.
bin/flink listIf the job execution encounters an error, you can view detailed error information in the Flink logs. Also, you can modify the Flink configurations in the file conf/flink-conf.yaml, such as memory and slot.
Notes
-
How to enable MySQL binlog?
-
Modify /etc/my.cnf:
# Enable binlog
log-bin=/var/lib/mysql/mysql-bin

#log_bin=ON
## Base name of binlog files
#log_bin_basename=/var/lib/mysql/mysql-bin
## Index file for binlog files, managing all binlog files
#log_bin_index=/var/lib/mysql/mysql-bin.index
# Configure server id
server-id=1
binlog_format = row -
Restart mysqld. You can check whether MySQL binlog is enabled by executing
SHOW VARIABLES LIKE 'log_bin';.
-
Synchronize PostgreSQL to StarRocks
Introduction
Flink CDC connector and SMT can synchronize data from PostgreSQL within subsecond.
SMT can automatically generate CREATE TABLE statements of the Flink's source and sink tables based on the cluster information and table structure of PostgreSQL and StarRocks.
Flink CDC connector reads the WAL of PostgreSQL and Flink-connector-starrocks writes data to StarRocks .
Steps
-
Download Flink. The version of Flink is supported to be 1.11 or later.
-
Download Flink CDC connector. Make sure that you download the flink-sql-connector-postgres-cdc-xxx.jar corresponding to the version of Flink.
-
Download Flink StarRocks connector.
-
Copy flink-sql-connector-postgres-cdc-xxx.jar and flink-connector-starrocks-xxx.jar to flink-xxx/lib/.
-
Download smt.tar.gz.
-
Extract and modify the configuration file of SMT.
[db]
host = 192.168.1.1
port = 5432
user = xxx
password = xxx
type = pgsql

[other]
# number of backends in StarRocks
be_num = 3
# `decimal_v3` is supported since StarRocks-1.18.1
use_decimal_v3 = false
# directory to save the converted DDL SQL
output_dir = ./result

[table-rule.1]
# pattern to match databases for setting properties
database = ^db$
# pattern to match tables for setting properties
table = ^table$
# pattern to match schemas for setting properties
schema = ^.*$

############################################
### flink sink configurations
### DO NOT set `connector`, `table-name`, `database-name`, they are auto-generated
############################################
flink.starrocks.jdbc-url=jdbc:mysql://192.168.1.1:9030
flink.starrocks.load-url= 192.168.1.1:8030
flink.starrocks.username=root
flink.starrocks.password=
flink.starrocks.sink.max-retries=10
flink.starrocks.sink.buffer-flush.interval-ms=15000
flink.starrocks.sink.properties.format=json
flink.starrocks.sink.properties.strip_outer_array=true -
Execute starrocks-migrate-tool. All SQL scripts are generated in the result directory.
$./starrocks-migrate-tool
$ls result
flink-create.1.sql    smt.tar.gz              starrocks-create.all.sql
flink-create.all.sql starrocks-create.1.sql -
Use a SQL script whose prefix is starrocks-create to generate the table in StarRocks.
mysql -hxx.xx.xx.x -P9030 -uroot -p < starrocks-create.all.sql -
Use a SQL script whose prefix is flink-create to generate the Flink source and sink tables, and start a Flink job to synchronize data.
bin/sql-client.sh embedded < flink-create.all.sqlAfter the above command is successfully executed, the Flink job to synchronize data keeps running.
-
Observe the status of the Flink job.
bin/flink listIf the job execution encounters an error, you can view detailed error information in the Flink logs. Also, you can modify the Flink configurations in the file conf/flink-conf.yaml, such as memory and slot.
Notes
-
For PostgreSQL
v9.*, a special flink-cdc configuration as shown below is required (It is recommended to use PostgreSQLv10.*or later. Otherwise, you need to install WAL decoding plugins):############################################
############################################
### flink-cdc plugin configuration for `postgresql`
############################################
### for `9.*` decoderbufs, wal2json, wal2json_rds, wal2json_streaming, wal2json_rds_streaming
### refer to https://ververica.github.io/flink-cdc-connectors/master/content/connectors/postgres-cdc.html
### and https://debezium.io/documentation/reference/postgres-plugins.html
### flink.cdc.decoding.plugin.name = decoderbufs -
How to enable PostgreSQL WAL?
# Open connection permissions
echo "host all all 0.0.0.0/32 trust" >> pg_hba.conf
echo "host replication all 0.0.0.0/32 trust" >> pg_hba.conf
# Enable wal logical replication
echo "wal_level = logical" >> postgresql.conf
echo "max_wal_senders = 2" >> postgresql.conf
echo "max_replication_slots = 8" >> postgresql.conf
Specify replica identity FULL for the tables that need to be synchronized.
ALTER TABLE schema_name.table_name REPLICA IDENTITY FULLAfter making these changes, restart PostgreSQL .
Synchronize Oracle to StarRocks
Introduction
Flink CDC connector and SMT can synchronize data from Oracle within subsecond.
SMT can automatically generate CREATE TABLE statements of the Flink's source and sink tables based on the cluster information and table structure of Oracle and StarRocks.
Flink CDC connector reads the logminer of Oracle and Flink-connector-starrocks writes data to StarRocks.
Steps
-
Download Flink. The version of Flink is supported to be 1.11 or later.
-
Download Flink CDC connector. Make sure that you download the flink-sql-connector-oracle-cdc-xxx.jar corresponding to the Flink version.
-
Download Flink StarRocks connector.
-
Copy
flink-sql-connector-oracle-cdc-xxx.jarandflink-connector-starrocks-xxx.jartoflink-xxx/lib/. -
Download smt.tar.gz.
-
Extract and modify the configuration file of SMT.
[db]
host = 192.168.1.1
port = 1521
user = xxx
password = xxx
type = oracle

[other]
# number of backends in StarRocks
be_num = 3
# `decimal_v3` is supported since StarRocks-1.18.1
use_decimal_v3 = false
# directory to save the converted DDL SQL
output_dir = ./result

[table-rule.1]
# pattern to match databases for setting properties
database = ^db$
# pattern to match tables for setting properties
table = ^table$
# pattern to match schemas for setting properties
schema = ^.*$

############################################
### flink sink configurations
### DO NOT set `connector`, `table-name`, `database-name`, they are auto-generated
############################################
flink.starrocks.jdbc-url=jdbc:mysql://192.168.1.1:9030
flink.starrocks.load-url= 192.168.1.1:8030
flink.starrocks.username=root
flink.starrocks.password=
flink.starrocks.sink.max-retries=10
flink.starrocks.sink.buffer-flush.interval-ms=15000
flink.starrocks.sink.properties.format=json
flink.starrocks.sink.properties.strip_outer_array=true -
Execute starrocks-migrate-tool. All SQL scripts are generated in the result directory.
$./starrocks-migrate-tool
$ls result
flink-create.1.sql    smt.tar.gz              starrocks-create.all.sql
flink-create.all.sql starrocks-create.1.sql -
Use a SQL script whose prefix is starrocks-create to generate the table in StarRocks.
mysql -hxx.xx.xx.x -P9030 -uroot -p < starrocks-create.all.sql -
Use a SQL script whose prefix is flink-create to generate the Flink source and sink tables, and start a Flink job to synchronize data.
bin/sql-client.sh embedded < flink-create.all.sqlAfter the above command is successfully executed, the Flink job to synchronize data keeps running.
-
Observe the status of the Flink job.
bin/flink listIf the job execution encounters an error, you can view detailed error information in the Flink logs. Also, you can modify the Flink configurations in the file conf/flink-conf.yaml, such as memory and slot.
Notes
-
Synchronize Oracle using logminer:
# Enable logging
alter system set db_recovery_file_dest = '/home/oracle/data' scope=spfile;
alter system set db_recovery_file_dest_size = 10G;
shutdown immediate;
startup mount;
alter database archivelog;
alter database open;

ALTER TABLE schema_name.table_name ADD SUPPLEMENTAL LOG DATA (ALL) COLUMNS;
ALTER DATABASE ADD SUPPLEMENTAL LOG DATA;

# Authorize user creation and grant permissions
GRANT CREATE SESSION TO flinkuser;
GRANT SET CONTAINER TO flinkuser;
GRANT SELECT ON V_$DATABASE TO flinkuser;
GRANT FLASHBACK ANY TABLE TO flinkuser;
GRANT SELECT ANY TABLE TO flinkuser;
GRANT SELECT_CATALOG_ROLE TO flinkuser;
GRANT EXECUTE_CATALOG_ROLE TO flinkuser;
GRANT SELECT ANY TRANSACTION TO flinkuser;
GRANT LOGMINING TO flinkuser;
GRANT CREATE TABLE TO flinkuser;
GRANT LOCK ANY TABLE TO flinkuser;
GRANT ALTER ANY TABLE TO flinkuser;
GRANT CREATE SEQUENCE TO flinkuser;
GRANT EXECUTE ON DBMS_LOGMNR TO flinkuser;
GRANT EXECUTE ON DBMS_LOGMNR_D TO flinkuser;
GRANT SELECT ON V_$LOG TO flinkuser;
GRANT SELECT ON V_$LOG_HISTORY TO flinkuser;
GRANT SELECT ON V_$LOGMNR_LOGS TO flinkuser;
GRANT SELECT ON V_$LOGMNR_CONTENTS TO flinkuser;
GRANT SELECT ON V_$LOGMNR_PARAMETERS TO flinkuser;
GRANT SELECT ON V_$LOGFILE TO flinkuser;
GRANT SELECT ON V_$ARCHIVED_LOG TO flinkuser;
GRANT SELECT ON V_$ARCHIVE_DEST_STATUS TO flinkuser; -
The database configurations in the [table-rule.1] does not support regular expression, so the complete database names need to be specified.
-
Because Oracle12c supports CDB mode, SMT internally automatically determines whether CDB is enabled and modifies the flink-cdc configuration correspondingly. However, users need to pay attention to whether the c## prefix needs to be added to the configuration of
[db].userto avoid issues of insufficient permission.
Synchronize Hive to StarRocks
Introduction
This guide explains how to use SMT to synchronize Hive data to StarRocks. During synchronization, a Duplicate table in StarRocks is created and a Flink job keeps running to synchronize data.
Steps
Preparations
[db]
# hiveserver2 service ip
host = 127.0.0.1
# hiveserver2 service port
port = 10000
user = hive/emr-header-1.cluster-49148
password =
type = hive
# only takes effect with `type = hive`.
# Available values: kerberos, none, nosasl, kerberos_http, none_http, zk, ldap
authentication = kerberos
The supported authentication methods are as follows:
- nosasl, zk: do not need to specify the
userandpassword. - none, none_http, ldap: specify the
userandpassword. - kerberos, kerberos_http: perform the following steps:
- Execute
kadmin.localon the Hive cluster and checklist_principalsto find the corresponding principal name. For example when the principal name ishive/emr-header-1.cluster-49148@EMR.49148.COM, the user needs to be set ashive/emr-header-1.cluster-49148, and the password is left empty. - Execute
kinit -kt /path/to/keytab principalon the machine where SMT is executed and executeklistto see if the correct token is generated.
- Execute
Data synchronization
-
Execute starrocks-migrate-tool.
-
Use a SQL script whose prefix is starrocks-create to generate the table in StarRocks.
mysql -hxx.xx.xx.x -P9030 -uroot -p < starrocks-create.all.sql -
In flink/conf/, create and edit the file sql-client-defaults.yaml:
execution:
planner: blink
type: batch
current-catalog: hive-starrocks
catalogs:
- name: hive-starrocks
type: hive
hive-conf-dir: /path/to/apache-hive-xxxx-bin/conf -
Download the dependency package (flink-sql-connector-hive-xxxx) from the Hive page of the corresponding version of Flink and place it in the
flink/libdirectory. -
Start the Flink cluster and execute
flink/bin/sql-client.sh embedded < result/flink-create.all.sqlto start data synchronization.
Synchronize SQL Server to StarRocks
Introduction
Flink CDC connector and SMT can synchronize data from SQL Server within subsecond.
SMT can automatically generate CREATE TABLE statements of the Flink's source and sink tables based on the cluster information and table structure of SQL Server and StarRocks.
Flink CDC connector captures and records row-level changes that occur in the SQL Server database server. The principle is to use the CDC feature provided by SQL Server itself. The CDC capability of SQL Server itself can archive specified changes in the database to specified change tables. The SQL Server CDC connector first reads historical data from the table using JDBC, and then fetches incremental changes from the change tables, thereby achieving full incremental synchronization. Then, Flink-connector-starrocks writes data to StarRocks.
Steps
-
Download Flink. The version of Flink is supported to be 1.11 or later.
-
Download Flink CDC connector. Make sure that you download the flink-sql-connector-sqlserver-cdc-xxx.jar corresponding to the Flink version.
-
Download Flink StarRocks connector.
-
Copy flink-sql-connector-sqlserver-cdc-xxx.jar, flink-connector-starrocks-xxx.jar to flink-xxx/lib/.
-
Download smt.tar.gz.
-
Extract and modify the configuration file of SMT.
[db]
host = 127.0.0.1
port = 1433
user = xxx
password = xxx

# currently available types: `mysql`, `pgsql`, `oracle`, `hive`, `clickhouse`
type = sqlserver

[other]
# number of backends in StarRocks
be_num = 3
# `decimal_v3` is supported since StarRocks-1.18.1
use_decimal_v3 = false
# directory to save the converted DDL SQL
output_dir = ./result

[table-rule.1]
# pattern to match databases for setting properties
database = ^db$
# pattern to match tables for setting properties
table = ^table$
schema = ^.*$

############################################
### flink sink configurations
### DO NOT set `connector`, `table-name`, `database-name`, they are auto-generated
############################################
flink.starrocks.jdbc-url=jdbc:mysql://192.168.1.1:9030
flink.starrocks.load-url= 192.168.1.1:8030
flink.starrocks.username=root
flink.starrocks.password=
flink.starrocks.sink.max-retries=10
flink.starrocks.sink.buffer-flush.interval-ms=15000
flink.starrocks.sink.properties.format=json
flink.starrocks.sink.properties.strip_outer_array=true -
Execute starrocks-migrate-tool. All SQL scripts are generated in the
resultdirectory.
```Bash $./starrocks-migrate-tool $ls result flink-create.1.sql smt.tar.gz starrocks-create.all.sql flink-create.all.sql starrocks-create.1.sql starrocks-external-create.all.sql
8. Use a SQL script whose prefix is `starrocks-create` to generate the table in StarRocks.

```Bash
mysql -hxx.xx.xx.x -P9030 -uroot -p < starrocks-create.all.sql
-
Use a SQL script whose prefix is
flink-createto generate the Flink source and sink tables, and start a Flink job to synchronize data.bin/sql-client.sh embedded < flink-create.all.sqlAfter the above command is successfully executed, the Flink job to synchronize data keeps running.
-
Observe the status of the Flink job.
bin/flink listIf the job execution encounters an error, you can view detailed error information in the Flink logs. Also, you can modify the Flink configurations in the file conf/flink-conf.yaml, such as memory and slot.
Notes
-
Make sure that the Server Agent Service is enabled.
Check if the Server Agent Service is running normally.
EXEC master.dbo.xp_servicecontrol N'QUERYSTATE', N'SQLSERVERAGENT'
GO
Enable the Server Agent Service.
/opt/mssql/bin/mssql-conf set sqlagent.enabled true -
Make sure that CDC for the corresponding database is enabled.
Check if CDC for the corresponding database is enabled.
select is_cdc_enabled, name from sys.databases where name = 'XXX_databases'
GO Enable CDC.
:::note
When executing this command, make sure that the user
serverRoleissysadmin. :::
USE XXX_databases
GO
EXEC sys.sp_cdc_enable_db
GO -
Make sure that CDC for the corresponding table is enabled.
EXEC sys.sp_cdc_enable_table
@source_schema = 'XXX_schema',
@source_name = 'XXX_table',
@role_name = NULL,
@supports_net_changes = 0;
GO
Synchronize TiDB to StarRocks
Introduction
Flink CDC connector and SMT can synchronize data from TiDB within subsecond.
SMT can automatically generate DDL statements for the Flink's source tables and sink tables based on the cluster information and table structure of TiDB and StarRocks.
The Flink CDC connector captures data by directly reading full and incremental data from the underlying TiKV storage. The full data is obtained from ranges partitioned based on keys, and the incremental data is obtained by using the CDC Client provided by TiDB. Subsequently, the data is written to StarRocks through Flink-connector-starrocks.
Steps
-
Download Flink. The version of Flink is supported to be 1.11 or later.
-
Download Flink CDC connector. Make sure that you download the flink-sql-connector-tidb-cdc-xxx.jar corresponding to the Flink version.
-
Download Flink StarRocks connector.
-
Copy flink-sql-connector-tidb-cdc-xxx.jar, flink-connector-starrocks-xxx.jar to flink-xxx/lib/.
-
Download smt.tar.gz.
-
Extract and modify the configuration file of SMT.
[db]
host = 127.0.0.1
port = 4000
user = root
password =
# currently available types: `mysql`, `pgsql`, `oracle`, `hive`, `clickhouse`, `sqlserver`, `tidb`
type = tidb
# # only takes effect on `type == hive`.
# # Available values: kerberos, none, nosasl, kerberos_http, none_http, zk, ldap
# authentication = kerberos

[other]
# number of backends in StarRocks
be_num = 3
# `decimal_v3` is supported since StarRocks-1.18.1
use_decimal_v3 = false
# directory to save the converted DDL SQL
output_dir = ./result

[table-rule.1]
# pattern to match databases for setting properties
database = ^db$
# pattern to match tables for setting properties
table = ^table$
schema = ^.*$

############################################
### flink sink configurations
### DO NOT set `connector`, `table-name`, `database-name`, they are auto-generated
############################################
flink.starrocks.jdbc-url=jdbc:mysql://192.168.1.1:9030
flink.starrocks.load-url= 192.168.1.1:8030
flink.starrocks.username=root
flink.starrocks.password=
flink.starrocks.sink.max-retries=10
flink.starrocks.sink.buffer-flush.interval-ms=15000
flink.starrocks.sink.properties.format=json
flink.starrocks.sink.properties.strip_outer_array=true

############################################
### flink-cdc configuration for `tidb`
############################################
# # Only takes effect on TiDB before v4.0.0.
# # TiKV cluster's PD address.
# flink.cdc.pd-addresses = 127.0.0.1:2379 -
Execute starrocks-migrate-tool*. All SQL scripts are generated in the
resultdirectory.$./starrocks-migrate-tool
$ls result
flink-create.1.sql smt.tar.gz starrocks-create.all.sql
flink-create.all.sql starrocks-create.1.sql starrocks-external-create.all.sql -
Use a SQL script whose prefix is
starrocks-createto generate the table in StarRocks.mysql -hxx.xx.xx.x -P9030 -uroot -p < starrocks-create.all.sql -
Use a SQL script whose prefix is
flink-createto generate the Flink source and sink tables, and start a Flink job to synchronize data.bin/sql-client.sh embedded < flink-create.all.sql
After the above command is successfully executed, the Flink job to synchronize data keeps running.
-
Observe the status of the Flink job.
bin/flink listIf the job execution encounters an error, you can view detailed error information in the Flink logs. Also, you can modify the Flink configurations in the file conf/flink-conf.yaml, such as memory and slot.
Notes
For TiDB whose version is before v4.0.0, additional configuration of flink.cdc.pd-addresses is required.
############################################
### flink-cdc configuration for `tidb`
############################################
# # Only takes effect on TiDB before v4.0.0.
# # TiKV cluster's PD address.
# flink.cdc.pd-addresses = 127.0.0.1:2379
