Data Cache
Understand the core principles of Data Cache and how to accelerate data queries with Data Cache.
Data Cache is used to cache the data of native tables and external tables. This feature is enabled by default from v3.3.0 onwards. And from v4.0 onwards, the in-memory cache and disk cache have been uniformly integrated into the Data Cache system to facilitate management.
Data Cache consists of two components: Page Cache (in-memory cache) and Block Cache (disk cache).
Principles of Page Cache
As an in-memory cache, Page Cache is responsible for storing data pages of native and external tables after decompression. The size of these pages is not fixed. Currently, Page Cache supports caching the following types of data:
- Data pages and index pages of native tables
- Footer information of external table data files
- Partial decompressed data pages of external tables
Page Cache currently uses the LRU (Least Recently Used) strategy for data eviction.
Principles of Block Cache
Block Cache is a disk-based cache whose primary function is to cache data files (from external tables, and also from cloud-native tables in shared-data cluster) to local disks. This reduces remote data access latency and improves query efficiency. The size of each data block is fixed.
Background and values
In data lake analytics and cloud-native table scenarios, StarRocks, acting as an OLAP query engine, needs to scan data files stored in HDFS or object storage (hereinafter referred to as the "remote storage system"). This process faces two major performance bottlenecks:
- The more files a query needs to read, the greater the remote I/O overhead.
- In ad-hoc query scenarios, frequent access to the same data leads to redundant remote I/O consumption.
To address these issues, the Block Cache feature has been introduced in v2.5. It splits raw data from the remote storage system into multiple blocks based on a specific strategy and caches these blocks in the local disks of BE or CN nodes. By avoiding repeated retrieval of remote data, the query performance against hot data is significantly improved.
Scenarios
- Query against data from remote storage systems using external catalogs (except JDBC Catalogs).
- Query against cloud-native tables in the shared-data clusters.
Core mechanism
Data splitting and cache unit
When the system caches remote files, it splits the original files into blocks of equal size according to the configured strategy. A block is the minimum cache unit, and its size is customizable.
Example:
If the block size is configured as 1 MB, when querying a 128 MB Parquet file on Amazon S3, the file will be split into 128 consecutive blocks (that is, [0, 1 MB), [1 MB, 2 MB), ..., [127 MB, 128 MB)).
Each block is assigned a globally unique cache identifier (cache key), which consists of the following three parts:
hash(filename) + fileModificationTime + blockId
| Component | Description |
|---|---|
| filename | The name of the data file. |
| fileModificationTime | The last time when the data file was modified. |
| blockId | The ID assigned to each block when a data file was split. This ID is unique within a single file but not globally unique. |
Cache Hit and Read Process
Assuming a query hits the block within the range [1 MB, 2 MB), Block Cache proceeds as follows:
- The system first checks whether the block exists in the local BE node's Block Cache (by matching the cache key).
- If found (cache hit), the block is read directly from the local disk.
- If not found (cache miss), the block is fetched from remote storage and synchronized to the local BE node's Block Cache for reuse in subsequent queries.
Cache medium
Block Cache uses the local disks of BE or CN nodes as its storage medium, and the cache acceleration effect is directly related to disk performance:
- It is recommended to use high-performance local disks (for example, NVMe disks) to minimize cache read/write latency.
- If disk performance is not optimal, you can increase the number of disks to achieve load balancing and reduce I/O pressure on individual disks.
Cache replacement policies
Block Cache supports two data caching and eviction strategies: LRU and SLRU (Segmented LRU).
LRU
The LRU strategy is based on the "Least Recently Used" principle - evicting the blocks that have not been accessed for the longest time. It is simple to implement, and suitable for scenarios with stable access patterns.
SLRU
The SLRU strategy divides the cache space into an eviction segment and a protection segment, both following the LRU rules:
- Data enters the eviction segment on first access.
- Data in the eviction segment is promoted to the protection segment when accessed again.
- Data evicted from the protection segment falls back to the eviction segment, while data evicted from the eviction segment is directly removed from the cache.
The SLRU strategy can effectively resist sudden sparse traffic, preventing "temporary data accessed only once" from directly evicting hot data in the protection segment. It offers better stability than LRU.
Enable and configure Data Cache
Data Cache is enabled by default, controlled by the BE configuration item datacache_enable (Default: true). Page Cache and Block Cache, as two independent components, are also enabled by default. Setting datacache_enable to false will disable Data Cache overall, that is, both Page Cache and Block Cache.
You can also activate or deactivate Page Cache and Block Cache separately using different BE configuration items.
- Page Cache (enabled by default) is controlled by
disable_storage_page_cache(Default:false). - Block Cache (enabled by default) is controlled by
block_cache_enable(Default:true).
You can further use the following BE configurations to set the maximum memory and disk usage limits for Data Cache, preventing excessive resource occupation:
datacache_mem_size: Sets the maximum memory usage limit for Data Cache (used for storing data in Page Cache).datacache_disk_size: Sets the maximum disk usage limit for Data Cache (used for storing data in Block Cache).
Populate Block Cache
Population rules
From v3.3.2 onwards, in order to improve the cache hit rate of Block Cache, the system populates Block Cache according to the following rules:
- The cache will not be populated for statements that are not
SELECT, for example,ANALYZE TABLEandINSERT INTO SELECT. - Queries that scan all partitions of a table will not populate the cache. However, if the table has only one partition, population is performed by default.
- Queries that scan all columns of a table will not populate the cache. However, if the table has only one column, population is performed by default.
- The cache will not be populated for tables that are not Hive, Paimon, Delta Lake, Hudi, or Iceberg.
View Cache Population Behavior
You can view the population behavior for a specific query with the EXPLAIN VERBOSE command.
Example:
mysql> EXPLAIN VERBOSE SELECT col1 FROM hudi_table;
...
|   0:HudiScanNode                        |
|      TABLE: hudi_table                  |
|      partitions=3/3                     |
|      cardinality=9084                   |
|      avgRowSize=2.0                     |
|      dataCacheOptions={populate: false} |
|      cardinality: 9084                  |
+-----------------------------------------+
dataCacheOptions={populate: false} indicates that the cache will not be populated because the query will scan all partitions.
You can also fine-tune the population behavior of Block Cache via the session variable populate_datacache_mode.
Population mode
Block Cache supports two modes, that is, synchronous population and asynchronous population. You can choose between them based on your business requirements for "first query performance" and "cache efficiency".
Synchronous Population
- Core Logic: When remote data is read for the first query, the data is immediately cached locally. Subsequent queries can directly reuse the cache.
- Pros: High cache efficiency because data caching is completed with a single query.
- Cons: Cache operations are executed synchronously with read operations, which may increase latency for the first query.
Asynchronous Population
- Core Logic: For the first query, data reading is prioritized and completed first. Cache writing is executed asynchronously in the background, without blocking the current query process.
- Pros: It will not affect the performance of first query and prevent read operations from being delayed due to caching.
- Cons: Lower cache efficiency because a single query may not fully cache all accessed data. It requires multiple queries to gradually improve cache coverage.
From v3.3.0, asynchronous cache population is enabled by default. You can change the population mode by setting the session variable enable_datacache_async_populate_mode.
Persistence
The cached data in disks can be persistent by default, and these data can be reused after BE or CN restarts.
Check whether a query hits data cache
You can check whether a query hits Data Cache by analyzing the following metrics in the query profile:
DataCacheReadBytes: the size of data that the system reads directly from the memory and disks.DataCacheWriteBytes: the size of data loaded from the remote storage system to the memory and disks.BytesRead: the total amount of data that is read, including data that the system reads from the remote storage system, and its memory and disks.
Example 1: In this example, the system reads a large amount of data (7.65 GB) from the remote storage system and only a few data (518.73 MB) from the disks. This means that few Block Caches were hit.
 - Table: lineorder
 - DataCacheReadBytes: 518.73 MB
   - __MAX_OF_DataCacheReadBytes: 4.73 MB
   - __MIN_OF_DataCacheReadBytes: 16.00 KB
 - DataCacheReadCounter: 684
   - __MAX_OF_DataCacheReadCounter: 4
   - __MIN_OF_DataCacheReadCounter: 0
 - DataCacheReadTimer: 737.357us
 - DataCacheWriteBytes: 7.65 GB
   - __MAX_OF_DataCacheWriteBytes: 64.39 MB
   - __MIN_OF_DataCacheWriteBytes: 0.00
 - DataCacheWriteCounter: 7.887K (7887)
   - __MAX_OF_DataCacheWriteCounter: 65
   - __MIN_OF_DataCacheWriteCounter: 0
 - DataCacheWriteTimer: 23.467ms
   - __MAX_OF_DataCacheWriteTimer: 62.280ms
   - __MIN_OF_DataCacheWriteTimer: 0ns
 - BufferUnplugCount: 15
   - __MAX_OF_BufferUnplugCount: 2
   - __MIN_OF_BufferUnplugCount: 0
 - BytesRead: 7.65 GB
   - __MAX_OF_BytesRead: 64.39 MB
   - __MIN_OF_BytesRead: 0.00
Example 2: In this example, the system reads a large amount of data (46.08 GB) from data cache and no data from the remote storage system, which means it reads data only from Block Cache.
Table: lineitem
- DataCacheReadBytes: 46.08 GB
 - __MAX_OF_DataCacheReadBytes: 194.99 MB
 - __MIN_OF_DataCacheReadBytes: 81.25 MB
- DataCacheReadCounter: 72.237K (72237)
 - __MAX_OF_DataCacheReadCounter: 299
 - __MIN_OF_DataCacheReadCounter: 118
- DataCacheReadTimer: 856.481ms
 - __MAX_OF_DataCacheReadTimer: 1s547ms
 - __MIN_OF_DataCacheReadTimer: 261.824ms
- DataCacheWriteBytes: 0.00
- DataCacheWriteCounter: 0
- DataCacheWriteTimer: 0ns
- BufferUnplugCount: 1.231K (1231)
 - __MAX_OF_BufferUnplugCount: 81
 - __MIN_OF_BufferUnplugCount: 35
- BytesRead: 46.08 GB
 - __MAX_OF_BytesRead: 194.99 MB
 - __MIN_OF_BytesRead: 81.25 MB
I/O Adaptor
To prevent significant tail latency in disk access due to high cache disk I/O load, which can lead to negative optimization of the cache system, Data Cache provides the I/O Adaptor feature. This feature routes some cache requests to remote storage when disk load is high, utilizing both local cache and remote storage to improve I/O throughput. This feature is enabled by default.
You can enable I/O Adaptor by setting the following system variable:
SET GLOBAL enable_datacache_io_adaptor=true;
Dynamic scaling
Data Cache supports manual adjustment of cache capacity without restarting the BE process, and also supports automatic adjustment of cache capacity.
Manual scaling
You can modify Data Cache's memory limit or disk capacity by dynamically adjusting BE configuration items.
Examples:
-- Adjust the Data Cache memory limit for a specific BE instance.
UPDATE be_configs SET VALUE="10G" WHERE NAME="datacache_mem_size" and BE_ID=10005;

-- Adjust the Data Cache memory ratio limit for all BE instances.
UPDATE be_configs SET VALUE="10%" WHERE NAME="datacache_mem_size";

-- Adjust the Data Cache disk limit for all BE instances.
UPDATE be_configs SET VALUE="2T" WHERE NAME="datacache_disk_size";
- Be cautious when adjusting capacities in this way. Make sure not to omit the WHERE clause to avoid modifying irrelevant configuration items.
- Cache capacity adjustments made this way will not be persisted and will be lost after the BE or CN process restarts. Therefore, you can first adjust the parameters dynamically as described above, and then manually modify the BE or CN configuration file to ensure that the changes take effect after the next restart.
Automatic Scaling
StarRocks currently supports automatic scaling of disk capacity. If you do not specify the cache disk path and capacity limit in the BE configuration, automatic scaling is enabled by default.
You can also enable automatic scaling by adding the following configuration item to the configuration file and restarting the BE or CN process:
datacache_auto_adjust_enable=true
After automatic scaling is enabled:
- When the disk usage exceeds the threshold specified by the BE configuration
disk_high_level(default value is90, that is, 90% of disk space), the system will automatically evict cache data to free up disk space. - When the disk usage is consistently below the threshold specified by the BE configuration
disk_low_level(default value is60, that is, 60% of disk space), and the current disk space used by Data Cache is full, the system will automatically expand the cache capacity. - When automatically scaling the cache capacity, the system will aim to adjust the cache capacity to the level specified by the BE configuration
disk_safe_level(default value is80, that is, 80% of disk space).
Cache Sharing
Because Data Cache depends on the BE node's local disk, when the cluster are being scaled, changes in data routing can cause cache misses, which can easily lead to significant performance degradation during the elastic scaling.
Cache Sharing is used to support accessing cache data between nodes through network. During cluster scaling, if a local cache miss occurs, the system first attempts to fetch cache data from other nodes within the same cluster. Only if all caches miss will the system re-fetch data from the remote storage. This feature effectively reduces the performance jitter caused by cache invalidation during elastic scaling and ensures stable query performance.
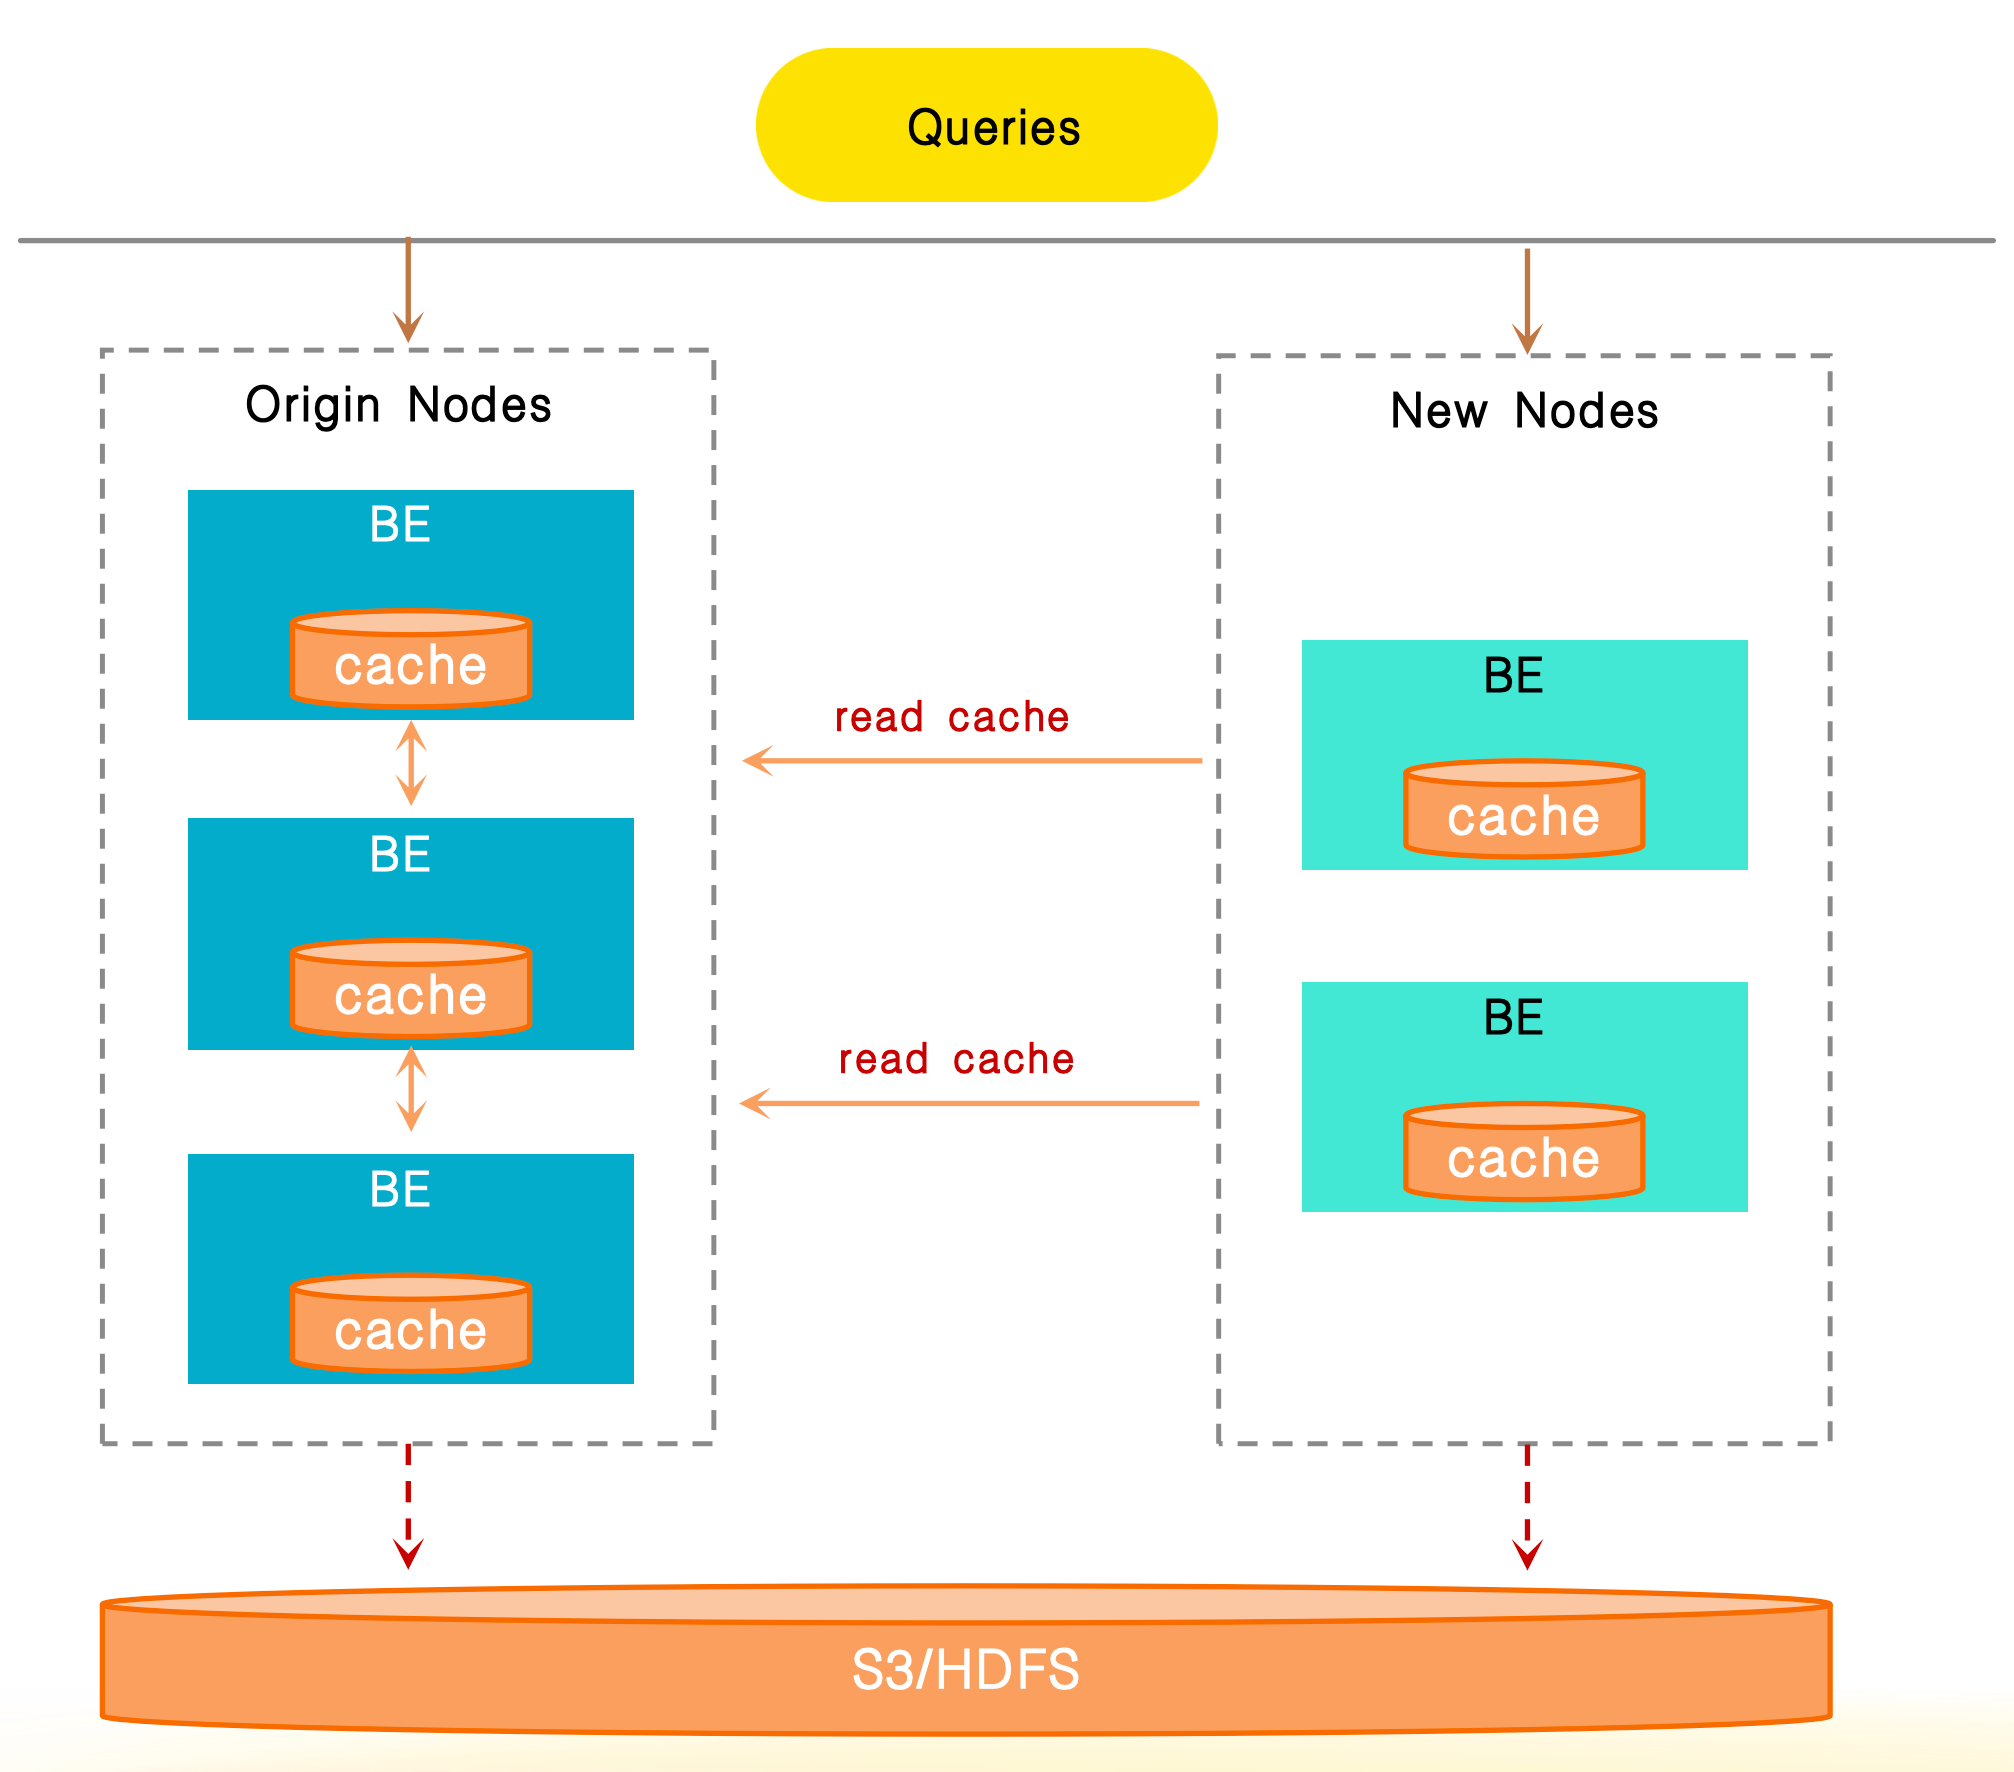
You can enable the Cache Sharing feature by configuring the following two items:
- Set the FE configuration item
enable_trace_historical_nodetotrue. - Set the system variable
enable_datacache_sharingtotrue.
In addition, you can check the following metrics in query profile to monitor Cache Sharing:
DataCacheReadPeerCounter: The read count from other nodes.DataCacheReadPeerBytes: The bytes read from other nodes.DataCacheReadPeerTimer: The time used for accessing cache data from other nodes.
Configurations and variables
You can configure Data Cache using the following system variables and parameters.
System variables
- populate_datacache_mode
- enable_datacache_io_adaptor
- enable_file_metacache
- enable_datacache_async_populate_mode
- enable_datacache_sharing
FE configurations
BE configurations
- datacache_enable
- datacache_mem_size
- datacache_disk_size
- datacache_auto_adjust_enable
- datacache_disk_high_level
- datacache_disk_safe_level
- datacache_disk_low_level
- datacache_disk_adjust_interval_seconds
- datacache_disk_idle_seconds_for_expansion
- datacache_min_disk_quota_for_adjustment
- datacache_eviction_policy
- datacache_inline_item_count_limit
