Hudi catalog
A Hudi catalog is a kind of external catalog that enables you to query data from Apache Hudi without ingestion.
Also, you can directly transform and load data from Hudi by using INSERT INTO based on Hudi catalogs. StarRocks supports Hudi catalogs from v2.4 onwards.
To ensure successful SQL workloads on your Hudi cluster, your StarRocks cluster must be able to access the storage system and metastore of your Hudi cluster. StarRocks supports the following storage systems and metastores:
-
Distributed file system (HDFS) or object storage like AWS S3, Microsoft Azure Storage, Google GCS, or other S3-compatible storage system (for example, MinIO)
-
Metastore like Hive metastore or AWS Glue
NOTE
If you choose AWS S3 as storage, you can use HMS or AWS Glue as metastore. If you choose any other storage system, you can only use HMS as metastore.
Usage notes
- The file format of Hudi that StarRocks supports is Parquet. Parquet files support the following compression formats: SNAPPY, LZ4, ZSTD, GZIP, and NO_COMPRESSION.
- StarRocks provides complete support for Copy On Write (COW) tables and Merge On Read (MOR) tables from Hudi.
Integration preparations
Before you create a Hudi catalog, make sure your StarRocks cluster can integrate with the storage system and metastore of your Hudi cluster.
AWS IAM
If your Hudi cluster uses AWS S3 as storage or AWS Glue as metastore, choose your suitable authentication method and make the required preparations to ensure that your StarRocks cluster can access the related AWS cloud resources.
The following authentication methods are recommended:
- Instance profile
- Assumed role
- IAM user
Of the above-mentioned three authentication methods, instance profile is the most widely used.
For more information, see Preparation for authentication in AWS IAM.
HDFS
If you choose HDFS as storage, configure your StarRocks cluster as follows:
-
(Optional) Set the username that is used to access your HDFS cluster and Hive metastore. By default, StarRocks uses the username of the FE and BE or CN processes to access your HDFS cluster and Hive metastore. You can also set the username by adding
export HADOOP_USER_NAME="<user_name>"at the beginning of the fe/conf/hadoop_env.sh file of each FE and at the beginning of the be/conf/hadoop_env.sh file of each BE or the cn/conf/hadoop_env.sh file of each CN. After you set the username in these files, restart each FE and each BE or CN to make the parameter settings take effect. You can set only one username for each StarRocks cluster. -
When you query Hudi data, the FEs and BEs or CNs of your StarRocks cluster use the HDFS client to access your HDFS cluster. In most cases, you do not need to configure your StarRocks cluster to achieve that purpose, and StarRocks starts the HDFS client using the default configurations. You need to configure your StarRocks cluster only in the following situations:
- High availability (HA) is enabled for your HDFS cluster: Add the hdfs-site.xml file of your HDFS cluster to the $FE_HOME/conf path of each FE and to the $BE_HOME/conf path of each BE or the $CN_HOME/conf path of each CN.
- View File System (ViewFs) is enabled for your HDFS cluster: Add the core-site.xml file of your HDFS cluster to the $FE_HOME/conf path of each FE and to the $BE_HOME/conf path of each BE or the $CN_HOME/conf path of each CN.
NOTE
If an error indicating an unknown host is returned when you send a query, you must add the mapping between the host names and IP addresses of your HDFS cluster nodes to the /etc/hosts path.
Kerberos authentication
If Kerberos authentication is enabled for your HDFS cluster or Hive metastore, configure your StarRocks cluster as follows:
- Run the
kinit -kt keytab_path principalcommand on each FE and each BE or CN to obtain Ticket Granting Ticket (TGT) from Key Distribution Center (KDC). To run this command, you must have the permissions to access your HDFS cluster and Hive metastore. Note that accessing KDC with this command is time-sensitive. Therefore, you need to use cron to run this command periodically. - Add
JAVA_OPTS="-Djava.security.krb5.conf=/etc/krb5.conf"to the $FE_HOME/conf/fe.conf file of each FE and to the $BE_HOME/conf/be.conf file of each BE or the $CN_HOME/conf/cn.conf file of each CN. In this example,/etc/krb5.confis the save path of the krb5.conf file. You can modify the path based on your needs.
Create a Hudi catalog
Syntax
CREATE EXTERNAL CATALOG <catalog_name>
[COMMENT <comment>]
PROPERTIES
(
    "type" = "hudi",
    MetastoreParams,
    StorageCredentialParams,
    MetadataUpdateParams
)
Parameters
catalog_name
The name of the Hudi catalog. The naming conventions are as follows:
- The name can contain letters, digits (0-9), and underscores (_). It must start with a letter.
- The name is case-sensitive and cannot exceed 1023 characters in length.
comment
The description of the Hudi catalog. This parameter is optional.
type
The type of your data source. Set the value to hudi.
MetastoreParams
A set of parameters about how StarRocks integrates with the metastore of your data source.
Hive metastore
If you choose Hive metastore as the metastore of your data source, configure MetastoreParams as follows:
"hive.metastore.type" = "hive",
"hive.metastore.uris" = "<hive_metastore_uri>"
NOTE
Before querying Hudi data, you must add the mapping between the host names and IP addresses of your Hive metastore nodes to the
/etc/hostspath. Otherwise, StarRocks may fail to access your Hive metastore when you start a query.
The following table describes the parameter you need to configure in MetastoreParams.
| Parameter | Required | Description |
|---|---|---|
| hive.metastore.type | Yes | The type of metastore that you use for your Hudi cluster. Set the value to hive. |
| hive.metastore.uris | Yes | The URI of your Hive metastore. Format: thrift://<metastore_IP_address>:<metastore_port>.If high availability (HA) is enabled for your Hive metastore, you can specify multiple metastore URIs and separate them with commas ( ,), for example, "thrift://<metastore_IP_address_1>:<metastore_port_1>,thrift://<metastore_IP_address_2>:<metastore_port_2>,thrift://<metastore_IP_address_3>:<metastore_port_3>". |
AWS Glue
If you choose AWS Glue as the metastore of your data source, which is supported only when you choose AWS S3 as storage, take one of the following actions:
-
To choose the instance profile-based authentication method, configure
MetastoreParamsas follows:"hive.metastore.type" = "glue",
"aws.glue.use_instance_profile" = "true",
"aws.glue.region" = "<aws_glue_region>" -
To choose the assumed role-based authentication method, configure
MetastoreParamsas follows:"hive.metastore.type" = "glue",
"aws.glue.use_instance_profile" = "true",
"aws.glue.iam_role_arn" = "<iam_role_arn>",
"aws.glue.region" = "<aws_glue_region>" -
To choose the IAM user-based authentication method, configure
MetastoreParamsas follows:"hive.metastore.type" = "glue",
"aws.glue.use_instance_profile" = "false",
"aws.glue.access_key" = "<iam_user_access_key>",
"aws.glue.secret_key" = "<iam_user_secret_key>",
"aws.glue.region" = "<aws_s3_region>"
The following table describes the parameters you need to configure in MetastoreParams.
| Parameter | Required | Description |
|---|---|---|
| hive.metastore.type | Yes | The type of metastore that you use for your Hudi cluster. Set the value to glue. |
| aws.glue.use_instance_profile | Yes | Specifies whether to enable the instance profile-based authentication method and the assumed role-based authentication method. Valid values: true and false. Default value: false. |
| aws.glue.iam_role_arn | No | The ARN of the IAM role that has privileges on your AWS Glue Data Catalog. If you use the assumed role-based authentication method to access AWS Glue, you must specify this parameter. |
| aws.glue.region | Yes | The region in which your AWS Glue Data Catalog resides. Example: us-west-1. |
| aws.glue.access_key | No | The access key of your AWS IAM user. If you use the IAM user-based authentication method to access AWS Glue, you must specify this parameter. |
| aws.glue.secret_key | No | The secret key of your AWS IAM user. If you use the IAM user-based authentication method to access AWS Glue, you must specify this parameter. |
For information about how to choose an authentication method for accessing AWS Glue and how to configure an access control policy in the AWS IAM Console, see Authentication parameters for accessing AWS Glue.
StorageCredentialParams
A set of parameters about how StarRocks integrates with your storage system. This parameter set is optional.
If you use HDFS as storage, you do not need to configure StorageCredentialParams.
If you use AWS S3, other S3-compatible storage system, Microsoft Azure Storage, or Google GCS as storage, you must configure StorageCredentialParams.
AWS S3
If you choose AWS S3 as storage for your Hudi cluster, take one of the following actions:
-
To choose the instance profile-based authentication method, configure
StorageCredentialParamsas follows:"aws.s3.use_instance_profile" = "true",
"aws.s3.region" = "<aws_s3_region>" -
To choose the assumed role-based authentication method, configure
StorageCredentialParamsas follows:"aws.s3.use_instance_profile" = "true",
"aws.s3.iam_role_arn" = "<iam_role_arn>",
"aws.s3.region" = "<aws_s3_region>" -
To choose the IAM user-based authentication method, configure
StorageCredentialParamsas follows:"aws.s3.use_instance_profile" = "false",
"aws.s3.access_key" = "<iam_user_access_key>",
"aws.s3.secret_key" = "<iam_user_secret_key>",
"aws.s3.region" = "<aws_s3_region>"
The following table describes the parameters you need to configure in StorageCredentialParams.
| Parameter | Required | Description |
|---|---|---|
| aws.s3.use_instance_profile | Yes | Specifies whether to enable the instance profile-based authentication method and the assumed role-based authentication method. Valid values: true and false. Default value: false. |
| aws.s3.iam_role_arn | No | The ARN of the IAM role that has privileges on your AWS S3 bucket. If you use the assumed role-based authentication method to access AWS S3, you must specify this parameter. |
| aws.s3.region | Yes | The region in which your AWS S3 bucket resides. Example: us-west-1. |
| aws.s3.access_key | No | The access key of your IAM user. If you use the IAM user-based authentication method to access AWS S3, you must specify this parameter. |
| aws.s3.secret_key | No | The secret key of your IAM user. If you use the IAM user-based authentication method to access AWS S3, you must specify this parameter. |
For information about how to choose an authentication method for accessing AWS S3 and how to configure an access control policy in AWS IAM Console, see Authentication parameters for accessing AWS S3.
S3-compatible storage system
Hudi catalogs support S3-compatible storage systems from v2.5 onwards.
If you choose an S3-compatible storage system, such as MinIO, as storage for your Hudi cluster, configure StorageCredentialParams as follows to ensure a successful integration:
"aws.s3.enable_ssl" = "false",
"aws.s3.enable_path_style_access" = "true",
"aws.s3.endpoint" = "<s3_endpoint>",
"aws.s3.access_key" = "<iam_user_access_key>",
"aws.s3.secret_key" = "<iam_user_secret_key>"
The following table describes the parameters you need to configure in StorageCredentialParams.
| Parameter | Required | Description |
|---|---|---|
| aws.s3.enable_ssl | Yes | Specifies whether to enable SSL connection. Valid values: true and false. Default value: true. |
| aws.s3.enable_path_style_access | Yes | Specifies whether to enable path-style access. Valid values: true and false. Default value: false. For MinIO, you must set the value to true.Path-style URLs use the following format: https://s3.<region_code>.amazonaws.com/<bucket_name>/<key_name>. For example, if you create a bucket named DOC-EXAMPLE-BUCKET1 in the US West (Oregon) Region, and you want to access the alice.jpg object in that bucket, you can use the following path-style URL: https://s3.us-west-2.amazonaws.com/DOC-EXAMPLE-BUCKET1/alice.jpg. |
| aws.s3.endpoint | Yes | The endpoint that is used to connect to your S3-compatible storage system instead of AWS S3. |
| aws.s3.access_key | Yes | The access key of your IAM user. |
| aws.s3.secret_key | Yes | The secret key of your IAM user. |
Microsoft Azure Storage
Hudi catalogs support Microsoft Azure Storage from v3.0 onwards.
Azure Blob Storage
If you choose Blob Storage as storage for your Hudi cluster, take one of the following actions:
-
To choose the Shared Key authentication method, configure
StorageCredentialParamsas follows:"azure.blob.storage_account" = "<storage_account_name>",
"azure.blob.shared_key" = "<storage_account_shared_key>"The following table describes the parameters you need to configure in
StorageCredentialParams.Parameter Required Description azure.blob.storage_account Yes The username of your Blob Storage account. azure.blob.shared_key Yes The shared key of your Blob Storage account. -
To choose the SAS Token authentication method, configure
StorageCredentialParamsas follows:"azure.blob.storage_account" = "<storage_account_name>",
"azure.blob.container" = "<container_name>",
"azure.blob.sas_token" = "<storage_account_SAS_token>"The following table describes the parameters you need to configure in
StorageCredentialParams.Parameter Required Description azure.blob.storage_account Yes The username of your Blob Storage account. azure.blob.container Yes The name of the blob container that stores your data. azure.blob.sas_token Yes The SAS token that is used to access your Blob Storage account.
Azure Data Lake Storage Gen2
If you choose Data Lake Storage Gen2 as storage for your Hudi cluster, take one of the following actions:
-
To choose the Managed Identity authentication method, configure
StorageCredentialParamsas follows:"azure.adls2.oauth2_use_managed_identity" = "true",
"azure.adls2.oauth2_tenant_id" = "<service_principal_tenant_id>",
"azure.adls2.oauth2_client_id" = "<service_client_id>"The following table describes the parameters you need to configure in
StorageCredentialParams.Parameter Required Description azure.adls2.oauth2_use_managed_identity Yes Specifies whether to enable the Managed Identity authentication method. Set the value to true.azure.adls2.oauth2_tenant_id Yes The ID of the tenant whose data you want to access. azure.adls2.oauth2_client_id Yes The client (application) ID of the managed identity. -
To choose the Shared Key authentication method, configure
StorageCredentialParamsas follows:"azure.adls2.storage_account" = "<storage_account_name>",
"azure.adls2.shared_key" = "<storage_account_shared_key>"The following table describes the parameters you need to configure in
StorageCredentialParams.Parameter Required Description azure.adls2.storage_account Yes The username of your Data Lake Storage Gen2 storage account. azure.adls2.shared_key Yes The shared key of your Data Lake Storage Gen2 storage account. -
To choose the Service Principal authentication method, configure
StorageCredentialParamsas follows:"azure.adls2.oauth2_client_id" = "<service_client_id>",
"azure.adls2.oauth2_client_secret" = "<service_principal_client_secret>",
"azure.adls2.oauth2_client_endpoint" = "<service_principal_client_endpoint>"The following table describes the parameters you need to configure
in StorageCredentialParams.Parameter Required Description azure.adls2.oauth2_client_id Yes The client (application) ID of the service principal. azure.adls2.oauth2_client_secret Yes The value of the new client (application) secret created. azure.adls2.oauth2_client_endpoint Yes The OAuth 2.0 token endpoint (v1) of the service principal or application. -
To choose the Workload Identity authentication method, configure
StorageCredentialParamsas follows:"azure.adls2.oauth2_token_file" = "<path_to_token>",
"azure.adls2.oauth2_tenant_id" = "<service_principal_tenant_id>",
"azure.adls2.oauth2_client_id" = "<service_client_id>"The following table describes the parameters you need to configure in
StorageCredentialParams.Parameter Required Description azure.adls2.oauth2_token_file Yes The absolute file path to the OAuth2 token file projected into the pod by the Azure Workload Identity webhook. azure.adls2.oauth2_tenant_id Yes The ID of the tenant whose data you want to access. azure.adls2.oauth2_client_id Yes The client ID (application ID) of the Azure AD application (user-assigned managed identity or app registration) associated with the workload identity.
Azure Data Lake Storage Gen1
If you choose Data Lake Storage Gen1 as storage for your Hudi cluster, take one of the following actions:
-
To choose the Managed Service Identity authentication method, configure
StorageCredentialParamsas follows:"azure.adls1.use_managed_service_identity" = "true"The following table describes the parameters you need to configure in
StorageCredentialParams.Parameter Required Description azure.adls1.use_managed_service_identity Yes Specifies whether to enable the Managed Service Identity authentication method. Set the value to true. -
To choose the Service Principal authentication method, configure
StorageCredentialParamsas follows:"azure.adls1.oauth2_client_id" = "<application_client_id>",
"azure.adls1.oauth2_credential" = "<application_client_credential>",
"azure.adls1.oauth2_endpoint" = "<OAuth_2.0_authorization_endpoint_v2>"The following table describes the parameters you need to configure in
StorageCredentialParams.Parameter Required Description azure.adls1.oauth2_client_id Yes The client (application) ID of the service principal. azure.adls1.oauth2_credential Yes The value of the new client (application) secret created. azure.adls1.oauth2_endpoint Yes The OAuth 2.0 token endpoint (v1) of the service principal or application.
Google GCS
Hudi catalogs support Google GCS from v3.0 onwards.
If you choose Google GCS as storage for your Hudi cluster, take one of the following actions:
-
To choose the VM-based authentication method, configure
StorageCredentialParamsas follows:"gcp.gcs.use_compute_engine_service_account" = "true"The following table describes the parameters you need to configure in
StorageCredentialParams.Parameter Default value Value example Description gcp.gcs.use_compute_engine_service_account false true Specifies whether to directly use the service account that is bound to your Compute Engine. -
To choose the service account-based authentication method, configure
StorageCredentialParamsas follows:"gcp.gcs.service_account_email" = "<google_service_account_email>",
"gcp.gcs.service_account_private_key_id" = "<google_service_private_key_id>",
"gcp.gcs.service_account_private_key" = "<google_service_private_key>"The following table describes the parameters you need to configure in
StorageCredentialParams.Parameter Default value Value example Description gcp.gcs.service_account_email "" "user@hello.iam.gserviceaccount.com" The email address in the JSON file generated at the creation of the service account. gcp.gcs.service_account_private_key_id "" "61d257bd8479547cb3e04f0b9b6b9ca07af3b7ea" The private key ID in the JSON file generated at the creation of the service account. gcp.gcs.service_account_private_key "" "-----BEGIN PRIVATE KEY----xxxx-----END PRIVATE KEY-----\n" The private key in the JSON file generated at the creation of the service account. -
To choose the impersonation-based authentication method, configure
StorageCredentialParamsas follows:-
Make a VM instance impersonate a service account:
"gcp.gcs.use_compute_engine_service_account" = "true",
"gcp.gcs.impersonation_service_account" = "<assumed_google_service_account_email>"The following table describes the parameters you need to configure in
StorageCredentialParams.Parameter Default value Value example Description gcp.gcs.use_compute_engine_service_account false true Specifies whether to directly use the service account that is bound to your Compute Engine. gcp.gcs.impersonation_service_account "" "hello" The service account that you want to impersonate. -
Make a service account (temporarily named as meta service account) impersonate another service account (temporarily named as data service account):
"gcp.gcs.service_account_email" = "<google_service_account_email>",
"gcp.gcs.service_account_private_key_id" = "<meta_google_service_account_email>",
"gcp.gcs.service_account_private_key" = "<meta_google_service_account_email>",
"gcp.gcs.impersonation_service_account" = "<data_google_service_account_email>"The following table describes the parameters you need to configure in
StorageCredentialParams.Parameter Default value Value example Description gcp.gcs.service_account_email "" "user@hello.iam.gserviceaccount.com" The email address in the JSON file generated at the creation of the meta service account. gcp.gcs.service_account_private_key_id "" "61d257bd8479547cb3e04f0b9b6b9ca07af3b7ea" The private key ID in the JSON file generated at the creation of the meta service account. gcp.gcs.service_account_private_key "" "-----BEGIN PRIVATE KEY----xxxx-----END PRIVATE KEY-----\n" The private key in the JSON file generated at the creation of the meta service account. gcp.gcs.impersonation_service_account "" "hello" The data service account that you want to impersonate.
-
MetadataUpdateParams
A set of parameters about how StarRocks updates the cached metadata of Hudi. This parameter set is optional.
StarRocks implements the automatic asynchronous update policy by default.
In most cases, you can ignore MetadataUpdateParams and do not need to tune the policy parameters in it, because the default values of these parameters already provide you with an out-of-the-box performance.
However, if the frequency of data updates in Hudi is high, you can tune these parameters to further optimize the performance of automatic asynchronous updates.
NOTE
In most cases, if your Hudi data is updated at a granularity of 1 hour or less, the data update frequency is considered high.
| Parameter | Required | Description |
|---|---|---|
| enable_metastore_cache | No | Specifies whether StarRocks caches the metadata of Hudi tables. Valid values: true and false. Default value: true. The value true enables the cache, and the value false disables the cache. |
| enable_remote_file_cache | No | Specifies whether StarRocks caches the metadata of the underlying data files of Hudi tables or partitions. Valid values: true and false. Default value: true. The value true enables the cache, and the value false disables the cache. |
| metastore_cache_refresh_interval_sec | No | The time interval at which StarRocks asynchronously updates the metadata of Hudi tables or partitions cached in itself. Unit: seconds. Default value: 7200, which is 2 hours. |
| remote_file_cache_refresh_interval_sec | No | The time interval at which StarRocks asynchronously updates the metadata of the underlying data files of Hudi tables or partitions cached in itself. Unit: seconds. Default value: 60. |
| metastore_cache_ttl_sec | No | The time interval at which StarRocks automatically discards the metadata of Hudi tables or partitions cached in itself. Unit: seconds. Default value: 86400, which is 24 hours. |
| remote_file_cache_ttl_sec | No | The time interval at which StarRocks automatically discards the metadata of the underlying data files of Hudi tables or partitions cached in itself. Unit: seconds. Default value: 129600, which is 36 hours. |
Examples
The following examples create a Hudi catalog named hudi_catalog_hms or hudi_catalog_glue, depending on the type of metastore you use, to query data from your Hudi cluster.
HDFS
If you use HDFS as storage, run a command like below:
CREATE EXTERNAL CATALOG hudi_catalog_hms
PROPERTIES
(
"type" = "hudi",
"hive.metastore.type" = "hive",
"hive.metastore.uris" = "thrift://xx.xx.xx.xx:9083"
);
AWS S3
If you choose instance profile-based credential
-
If you use Hive metastore in your Hudi cluster, run a command like below:
CREATE EXTERNAL CATALOG hudi_catalog_hms
PROPERTIES
(
"type" = "hudi",
"hive.metastore.type" = "hive",
"hive.metastore.uris" = "thrift://xx.xx.xx.xx:9083",
"aws.s3.use_instance_profile" = "true",
"aws.s3.region" = "us-west-2"
); -
If you use AWS Glue in your Amazon EMR Hudi cluster, run a command like below:
CREATE EXTERNAL CATALOG hudi_catalog_glue
PROPERTIES
(
"type" = "hudi",
"hive.metastore.type" = "glue",
"aws.glue.use_instance_profile" = "true",
"aws.glue.region" = "us-west-2",
"aws.s3.use_instance_profile" = "true",
"aws.s3.region" = "us-west-2"
);
If you choose assumed role-based credential
-
If you use Hive metastore in your Hudi cluster, run a command like below:
CREATE EXTERNAL CATALOG hudi_catalog_hms
PROPERTIES
(
"type" = "hudi",
"hive.metastore.type" = "hive",
"hive.metastore.uris" = "thrift://xx.xx.xx.xx:9083",
"aws.s3.use_instance_profile" = "true",
"aws.s3.iam_role_arn" = "arn:aws:iam::081976408565:role/test_s3_role",
"aws.s3.region" = "us-west-2"
); -
If you use AWS Glue in your Amazon EMR Hudi cluster, run a command like below:
CREATE EXTERNAL CATALOG hudi_catalog_glue
PROPERTIES
(
"type" = "hudi",
"hive.metastore.type" = "glue",
"aws.glue.use_instance_profile" = "true",
"aws.glue.iam_role_arn" = "arn:aws:iam::081976408565:role/test_glue_role",
"aws.glue.region" = "us-west-2",
"aws.s3.use_instance_profile" = "true",
"aws.s3.iam_role_arn" = "arn:aws:iam::081976408565:role/test_s3_role",
"aws.s3.region" = "us-west-2"
);
If you choose IAM user-based credential
-
If you use Hive metastore in your Hudi cluster, run a command like below:
CREATE EXTERNAL CATALOG hudi_catalog_hms
PROPERTIES
(
"type" = "hudi",
"hive.metastore.type" = "hive",
"hive.metastore.uris" = "thrift://xx.xx.xx.xx:9083",
"aws.s3.use_instance_profile" = "false",
"aws.s3.access_key" = "<iam_user_access_key>",
"aws.s3.secret_key" = "<iam_user_access_key>",
"aws.s3.region" = "us-west-2"
); -
If you use AWS Glue in your Amazon EMR Hudi cluster, run a command like below:
CREATE EXTERNAL CATALOG hudi_catalog_glue
PROPERTIES
(
"type" = "hudi",
"hive.metastore.type" = "glue",
"aws.glue.use_instance_profile" = "false",
"aws.glue.access_key" = "<iam_user_access_key>",
"aws.glue.secret_key" = "<iam_user_secret_key>",
"aws.glue.region" = "us-west-2",
"aws.s3.use_instance_profile" = "false",
"aws.s3.access_key" = "<iam_user_access_key>",
"aws.s3.secret_key" = "<iam_user_secret_key>",
"aws.s3.region" = "us-west-2"
);
S3-compatible storage system
Use MinIO as an example. Run a command like below:
CREATE EXTERNAL CATALOG hudi_catalog_hms
PROPERTIES
(
"type" = "hudi",
"hive.metastore.type" = "hive",
"hive.metastore.uris" = "thrift://xx.xx.xx.xx:9083",
"aws.s3.enable_ssl" = "true",
"aws.s3.enable_path_style_access" = "true",
"aws.s3.endpoint" = "<s3_endpoint>",
"aws.s3.access_key" = "<iam_user_access_key>",
"aws.s3.secret_key" = "<iam_user_secret_key>"
);
Microsoft Azure Storage
Azure Blob Storage
-
If you choose the Shared Key authentication method, run a command like below:
CREATE EXTERNAL CATALOG hudi_catalog_hms
PROPERTIES
(
"type" = "hudi",
"hive.metastore.type" = "hive",
"hive.metastore.uris" = "thrift://xx.xx.xx.xx:9083",
"azure.blob.storage_account" = "<blob_storage_account_name>",
"azure.blob.shared_key" = "<blob_storage_account_shared_key>"
); -
If you choose the SAS Token authentication method, run a command like below:
CREATE EXTERNAL CATALOG hudi_catalog_hms
PROPERTIES
(
"type" = "hudi",
"hive.metastore.type" = "hive",
"hive.metastore.uris" = "thrift://xx.xx.xx.xx:9083",
"azure.blob.storage_account" = "<blob_storage_account_name>",
"azure.blob.container" = "<blob_container_name>",
"azure.blob.sas_token" = "<blob_storage_account_SAS_token>"
);
Azure Data Lake Storage Gen1
-
If you choose the Managed Service Identity authentication method, run a command like below:
CREATE EXTERNAL CATALOG hudi_catalog_hms
PROPERTIES
(
"type" = "hudi",
"hive.metastore.type" = "hive",
"hive.metastore.uris" = "thrift://xx.xx.xx.xx:9083",
"azure.adls1.use_managed_service_identity" = "true"
); -
If you choose the Service Principal authentication method, run a command like below:
CREATE EXTERNAL CATALOG hudi_catalog_hms
PROPERTIES
(
"type" = "hudi",
"hive.metastore.type" = "hive",
"hive.metastore.uris" = "thrift://xx.xx.xx.xx:9083",
"azure.adls1.oauth2_client_id" = "<application_client_id>",
"azure.adls1.oauth2_credential" = "<application_client_credential>",
"azure.adls1.oauth2_endpoint" = "<OAuth_2.0_authorization_endpoint_v2>"
);
Azure Data Lake Storage Gen2
-
If you choose the Managed Identity authentication method, run a command like below:
CREATE EXTERNAL CATALOG hudi_catalog_hms
PROPERTIES
(
"type" = "hudi",
"hive.metastore.type" = "hive",
"hive.metastore.uris" = "thrift://xx.xx.xx.xx:9083",
"azure.adls2.oauth2_use_managed_identity" = "true",
"azure.adls2.oauth2_tenant_id" = "<service_principal_tenant_id>",
"azure.adls2.oauth2_client_id" = "<service_client_id>"
); -
If you choose the Shared Key authentication method, run a command like below:
CREATE EXTERNAL CATALOG hudi_catalog_hms
PROPERTIES
(
"type" = "hudi",
"hive.metastore.type" = "hive",
"hive.metastore.uris" = "thrift://xx.xx.xx.xx:9083",
"azure.adls2.storage_account" = "<storage_account_name>",
"azure.adls2.shared_key" = "<shared_key>"
); -
If you choose the Service Principal authentication method, run a command like below:
CREATE EXTERNAL CATALOG hudi_catalog_hms
PROPERTIES
(
"type" = "hudi",
"hive.metastore.uris" = "thrift://xx.xx.xx.xx:9083",
"azure.adls2.oauth2_client_id" = "<service_client_id>",
"azure.adls2.oauth2_client_secret" = "<service_principal_client_secret>",
"azure.adls2.oauth2_client_endpoint" = "<service_principal_client_endpoint>"
); -
If you choose the Workload Identity authentication method, run a command like below:
CREATE EXTERNAL CATALOG hudi_catalog_hms
PROPERTIES
(
"type" = "hudi",
"hive.metastore.type" = "hive",
"hive.metastore.uris" = "thrift://xx.xx.xx.xx:9083",
"azure.adls2.oauth2_token_file" = "/var/run/secrets/azure/tokens/azure-identity-token",
"azure.adls2.oauth2_tenant_id" = "<service_principal_tenant_id>",
"azure.adls2.oauth2_client_id" = "<service_client_id>"
);
Google GCS
-
If you choose the VM-based authentication method, run a command like below:
CREATE EXTERNAL CATALOG hudi_catalog_hms
PROPERTIES
(
"type" = "hudi",
"hive.metastore.type" = "hive",
"hive.metastore.uris" = "thrift://xx.xx.xx.xx:9083",
"gcp.gcs.use_compute_engine_service_account" = "true"
); -
If you choose the service account-based authentication method, run a command like below:
CREATE EXTERNAL CATALOG hudi_catalog_hms
PROPERTIES
(
"type" = "hudi",
"hive.metastore.uris" = "thrift://xx.xx.xx.xx:9083",
"gcp.gcs.service_account_email" = "<google_service_account_email>",
"gcp.gcs.service_account_private_key_id" = "<google_service_private_key_id>",
"gcp.gcs.service_account_private_key" = "<google_service_private_key>"
); -
If you choose the impersonation-based authentication method:
-
If you make a VM instance impersonate a service account, run a command like below:
CREATE EXTERNAL CATALOG hudi_catalog_hms
PROPERTIES
(
"type" = "hudi",
"hive.metastore.type" = "hive",
"hive.metastore.uris" = "thrift://xx.xx.xx.xx:9083",
"gcp.gcs.use_compute_engine_service_account" = "true",
"gcp.gcs.impersonation_service_account" = "<assumed_google_service_account_email>"
); -
If you make a service account impersonate another service account, run a command like below:
CREATE EXTERNAL CATALOG hudi_catalog_hms
PROPERTIES
(
"type" = "hudi",
"hive.metastore.type" = "hive",
"hive.metastore.uris" = "thrift://xx.xx.xx.xx:9083",
"gcp.gcs.service_account_email" = "<google_service_account_email>",
"gcp.gcs.service_account_private_key_id" = "<meta_google_service_account_email>",
"gcp.gcs.service_account_private_key" = "<meta_google_service_account_email>",
"gcp.gcs.impersonation_service_account" = "<data_google_service_account_email>"
);
-
View Hudi catalogs
You can use SHOW CATALOGS to query all catalogs in the current StarRocks cluster:
SHOW CATALOGS;
You can also use SHOW CREATE CATALOG to query the creation statement of an external catalog. The following example queries the creation statement of a Hudi catalog named hudi_catalog_glue:
SHOW CREATE CATALOG hudi_catalog_glue;
Switch to a Hudi Catalog and a database in it
You can use one of the following methods to switch to a Hudi catalog and a database in it:
-
Use SET CATALOG to specify a Hudi catalog in the current session, and then use USE to specify an active database:
-- Switch to a specified catalog in the current session:
SET CATALOG <catalog_name>
-- Specify the active database in the current session:
USE <db_name> -
Directly use USE to switch to a Hudi catalog and a database in it:
USE <catalog_name>.<db_name>
Drop a Hudi catalog
You can use DROP CATALOG to drop an external catalog.
The following example drops a Hudi catalog named hudi_catalog_glue:
DROP Catalog hudi_catalog_glue;
View the schema of a Hudi table
You can use one of the following syntaxes to view the schema of a Hudi table:
-
View schema
DESC[RIBE] <catalog_name>.<database_name>.<table_name> -
View schema and location from the CREATE statement
SHOW CREATE TABLE <catalog_name>.<database_name>.<table_name>
Query a Hudi table
-
Use SHOW DATABASES to view the databases in your Hudi cluster:
SHOW DATABASES FROM <catalog_name> -
Use SELECT to query the destination table in the specified database:
SELECT count(*) FROM <table_name> LIMIT 10
Load data from Hudi
Suppose you have an OLAP table named olap_tbl, you can transform and load data like below:
INSERT INTO default_catalog.olap_db.olap_tbl SELECT * FROM hudi_table
Manually or automatically update metadata cache
Manual update
By default, StarRocks caches the metadata of Hudi and automatically updates the metadata in asynchronous mode to deliver better performance. Additionally, after some schema changes or table updates are made on a Hudi table, you can also use REFRESH EXTERNAL TABLE to manually update its metadata, thereby ensuring that StarRocks can obtain up-to-date metadata at its earliest opportunity and generate appropriate execution plans:
REFRESH EXTERNAL TABLE <table_name> [PARTITION ('partition_name', ...)]
Appendix: Understand metadata automatic asynchronous update
Automatic asynchronous update is the default policy that StarRocks uses to update the metadata in Hudi catalogs.
By default (namely, when the enable_metastore_cache and enable_remote_file_cache parameters are both set to true), if a query hits a partition of a Hudi table, StarRocks automatically caches the metadata of the partition and the metadata of the underlying data files of the partition. The cached metadata is updated by using the lazy update policy.
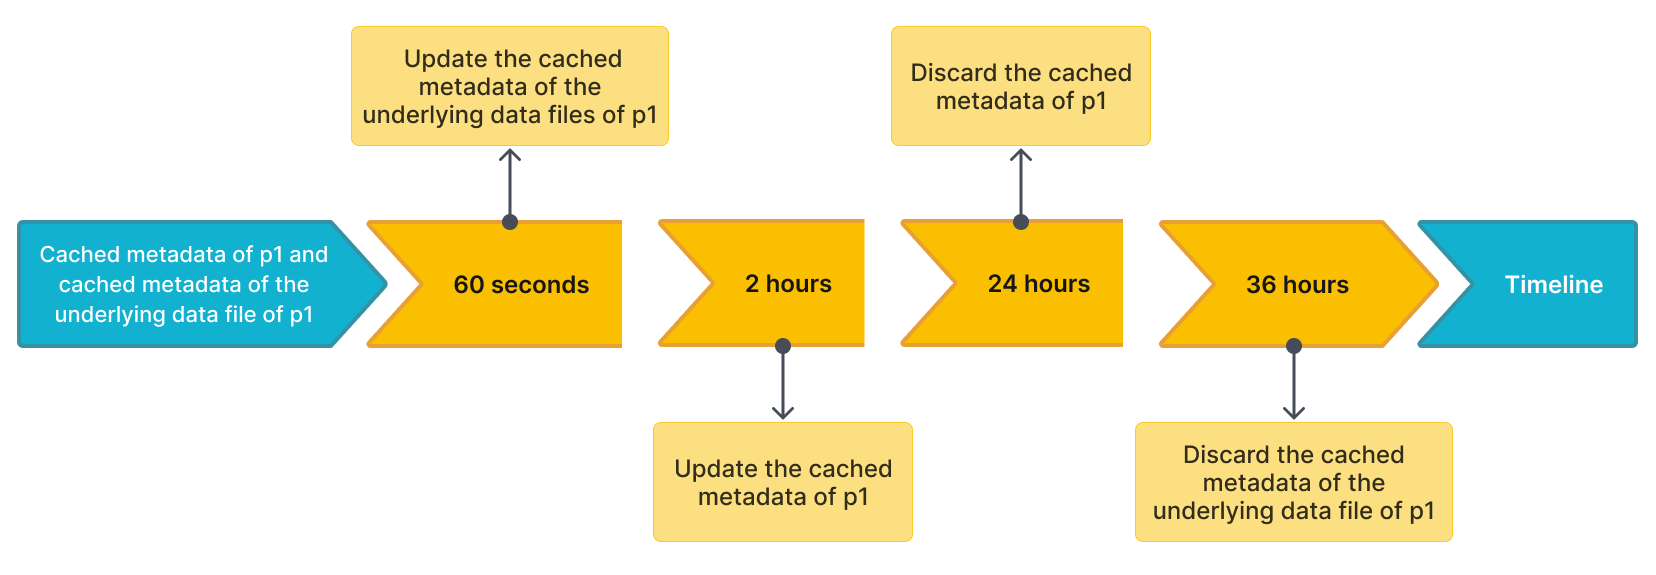
For example, there is a Hudi table named table2, which has four partitions: p1, p2, p3, and p4. A query hits p1, and StarRocks caches the metadata of p1 and the metadata of the underlying data files of p1. Assume that the default time intervals to update and discard the cached metadata are as follows:
- The time interval (specified by the
metastore_cache_refresh_interval_secparameter) to asynchronously update the cached metadata ofp1is 2 hours. - The time interval (specified by the
remote_file_cache_refresh_interval_secparameter) to asynchronously update the cached metadata of the underlying data files ofp1is 60 seconds. - The time interval (specified by the
metastore_cache_ttl_secparameter) to automatically discard the cached metadata ofp1is 24 hours. - The time interval (specified by the
remote_file_cache_ttl_secparameter) to automatically discard the cached metadata of the underlying data files ofp1is 36 hours.
The following figure shows the time intervals on a timeline for easier understanding.
Then StarRocks updates or discards the metadata in compliance with the following rules:
- If another query hits
p1again and the current time from the last update is less than 60 seconds, StarRocks does not update the cached metadata ofp1or the cached metadata of the underlying data files ofp1. - If another query hits
p1again and the current time from the last update is more than 60 seconds, StarRocks updates the cached metadata of the underlying data files ofp1. - If another query hits
p1again and the current time from the last update is more than 2 hours, StarRocks updates the cached metadata ofp1. - If
p1has not been accessed within 24 hours from the last update, StarRocks discards the cached metadata ofp1. The metadata will be cached at the next query. - If
p1has not been accessed within 36 hours from the last update, StarRocks discards the cached metadata of the underlying data files ofp1. The metadata will be cached at the next query.
